Despite the fact that today in stores you can find any kind of Christmas decorations for the Christmas tree and the interior, we still want to bring into the decoration of the house that very fabulous and magical atmosphere that only DIY Christmas decorations can create.
1. Wreath


One of the most common New Year and Christmas decorations in the Western world is the wreath. It is worth noting that a wreath is a very compact, beautiful and versatile decoration - it can decorate both the front door and the interior of the house, and even the New Year's table.
In addition, making a New Year's wreath with your own hands is as easy as shelling pears. There are a lot of options for creativity, but they all converge to a common denominator - the shape or frame for a wreath. This form can be bought at a specialized store - it can be a round foam base, to which decorative elements of a wreath are glued (as in the first photo), as well as a wicker form of branches and dried flowers, and more.
However, the base for a wreath can be made quite cheaply and cheerfully on your own. In the second photo, you can see that Christmas tree balls are strung on ordinary thick wire, and as a result, a very voluminous and beautiful wreath is obtained. But there are some nuances here - you need to select such Christmas toys that sit tightly on their metal hangers (mounts for the ball), or plastic balls.
We can also advise wrapping the wire frame for volume with newspapers, then with parchment and a piece of cloth, and on top of it you can stick or sew on tinsel, spruce branches, cones, berries and other decorations.
Wreath on the table:

2. Original and delicate garland with ribbon

Making such a Christmas decoration with your own hands is very simple: you need to tie an ordinary garland with tulle or organza bows.
3. Luminous vessels

A very unusual idea for creating a New Year's interior: you can either lower the garland into the bottle through the neck or carefully saw off the bottom of the bottle and then you can insert a candle into the neck (if desired).
3. Pillow gifts

To create a festive atmosphere in the house, you can decorate sofa cushions with bows, turning them into gifts.
4. Decorations from ... toilet paper
Or rather, from an oval cardboard base left over from used toilet paper. Just look at how beautiful Christmas decorations are obtained!

5. Candy garland

By gluing candy wrappers, you can create an incredibly beautiful and tasty garland, which you can then eat.
6. Orange decorations

With the help of ribbon, lace, oranges and dried cloves, you can make very interesting DIY Christmas decorations.
7. Tree in weightlessness


This idea will appeal to those who prefer the original approach in everything.
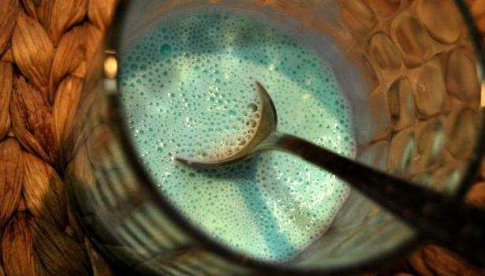
8. DIY Magic Snow Globes


In fact, such decorations are very easy to make yourself. To do this, you will need: a glass container with a solid screw cap, a figurine toy, sequins, water, glue and glycerin. We glue the toy to the lid, pour glitter into the jar, pour water and a few drops of glycerin, screw the lid properly, turn it over - our magical New Year's snow globe is ready!
Making an apartment for the New Year is a whole ritual in which the whole family takes part! This activity gives a good mood and a special atmosphere in the approaching holiday. It is especially nice if you made all the Christmas decorations for the house with your own hands.
DIY Christmas decorations on the table
Recently, people have begun to pay much more attention to the design of the festive table. There is a completely logical explanation for this: during meals, the aesthetic component plays an important role - the more beautiful the table at which we eat, the more pleasant the festive dinner is.
Most often they choose New Year's decorations on the table in the form of small handmade paper Christmas trees. There are many ways to complement the composition with an artificial Christmas tree.
natural materials
DIY Christmas decorations made of natural materials will look very harmonious not only on the table: they can decorate shelves, front doors, cabinets - everything that your imagination is enough for.
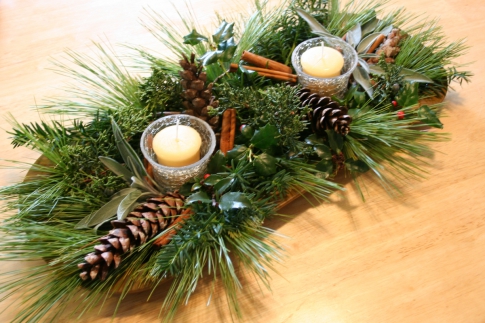
One of the easiest ways involves the use of fir cones. Place thick shiny candles in the center of the table and arrange the cones around them in a chaotic manner.

To match the color of the decoration with the overall holiday decoration, paint the cones with shiny bright colors. Add nuts, small fir twigs, chestnuts to the cones to create a warm and cozy Christmas evening atmosphere.

If you add dried citrus peels to a natural composition, you will get a wonderful aromatic craft. Arrange the fragrant elements in plastic bags, add beautiful beads, sparkles there, tie the edges with ribbons and make small holes so that the smell comes out of the bags - you can safely distribute such sachets to friends after the festive evening as a nice present.
Ribbon decorations
Ribbons have always been considered an element of the holiday, and the New Year is no exception. So, you can decorate the table with snowflakes made in an unconventional way - using ribbons folded in the Japanese kanzashi style.
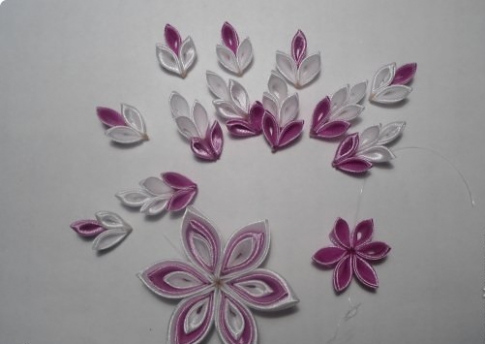
- Prepare 6 large white and pink satin ribbon squares, 36 pink and 24 smaller white squares.

- Fold the square diagonally, forming a triangle, and glue the ends of the long side - this is how you get a petal. Transform all blanks in a similar way.

- Prepare the details of the decoration by gluing the parts together - you should get 6 large branches, 6 small, large and small flowers, as in the photo.
- Connect the parts together, as in the photo.
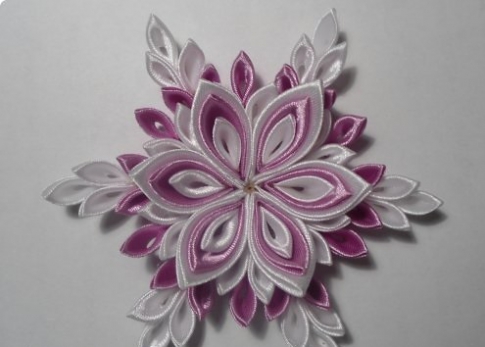
Such a beautiful snowflake can be placed next to the guests' plates before the start of the banquet.
Decorations on the windows for the New Year
When you prepare Christmas decorations with your own hands, do not forget about the windows - without them, the festive look of the room may look unfinished. There are many different ways to decorate window space - just choose the one that suits you best.
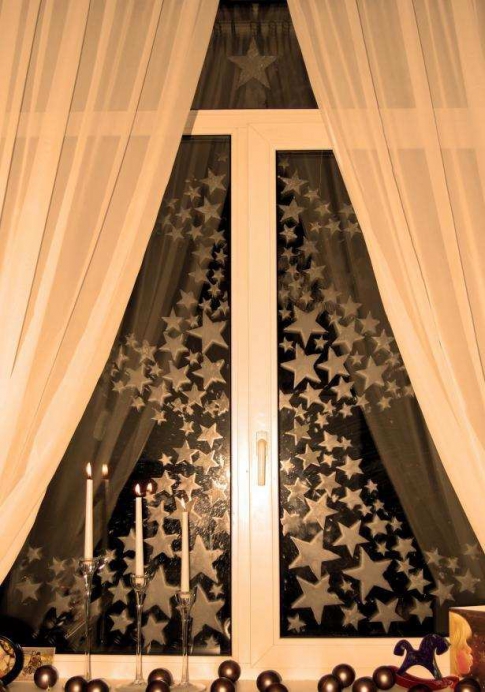
starry sky
If you decorate transparent windows with shining stars and look through them in the evening, you will get the impression that your apartment is overlooking a clear starry sky.
White tooth powder or paste, shiny powder, thick paper - that's all you need for the workflow.
- Draw stencils of stars of different sizes on paper and cut them out.

- Mix tooth powder with water, stirring the mixture to the consistency of thick sour cream. At this stage, you can add glitter.
- Attach the stencils to the glass and use a dishwashing sponge to apply a small coat of paint to the windows.
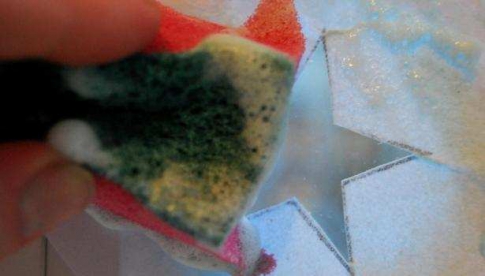
- In this master class, the author placed stencils on the window in the form of fir branches - the drawing turned out to be very beautiful and even, but you can draw any picture with stars.
With the help of stencils, you can also cut out paper pictures on the New Year theme and create a composition from them on the window.
Pendants and garlands
In addition to gluing materials directly onto windows, you can make hanging DIY Christmas decorations. Use everything you find at home - sometimes amazing ideas are brought to life from materials that, it would seem, are high time to be thrown away!
For example, if you are engaged in embroidery or knitting, "warm" your apartment with soft garlands of colored yarn balls. It is very easy to make pompoms - tie a lot of thread scraps in the middle with a thread of the same color and fluff until a ball is formed.

Put several of these pompoms on a long thread or ribbon, make about ten blanks and hang them in front of the window.
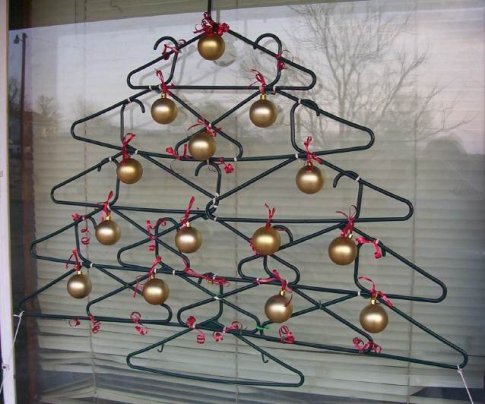
If you like non-standard solutions, try making DIY Christmas decorations for your home from old hangers! Link them together to form a festive tree and decorate with Christmas decorations.
For conservatives, we also have a couple of ideas - New Year's garlands with luminous bulbs! With their help, you will turn the window into a real festive illumination, which will not only help create a carnival atmosphere from the inside - passers-by who will look at your window from the street will immediately feel the warmth of home comfort.
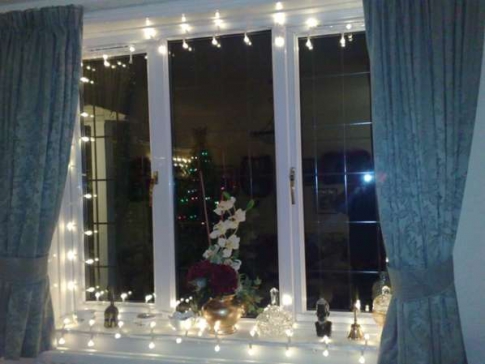
Garlands can be placed over the entire area of the window, in the upper part or only around the perimeter, outlining the contour, hanging in a strictly established order or in the form of a pattern.
Festive interior design
To give your home a complete look, along with windows, a festive table and a Christmas tree, also prepare New Year's decorations with your own hands for the entire apartment.
Christmas decorations
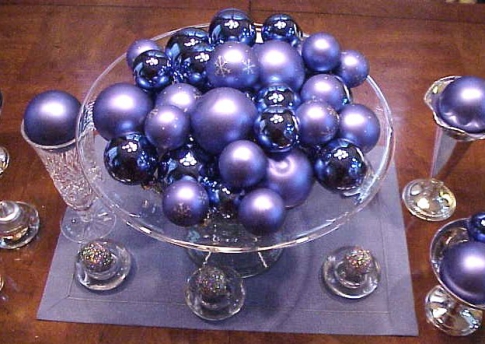
Who said that painted balls are only allowed to be hung on a Christmas tree? Leading designers claim that this season's Christmas decorations are suitable for decorating an apartment, and strongly recommend using them as much as possible.

For example, fill a large transparent vase or a wide plate with many small shiny balls that match in color and texture, and put the composition on a chest of drawers.
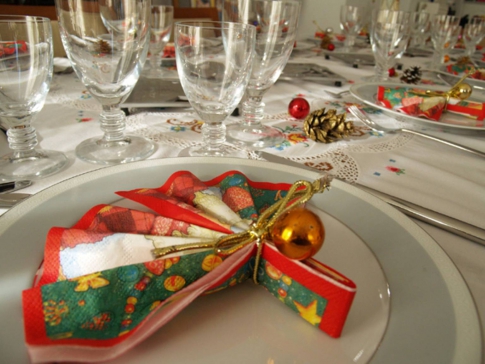
Miniature shiny balls are easy to assemble into a neat brooch - decorate a beautifully folded table napkin with it.
And do not forget about traditional paper garlands in the form of a chain, fringed or imitating frosty patterns - stretch them under the ceiling, decorate a window frame or the edges of a festive table.
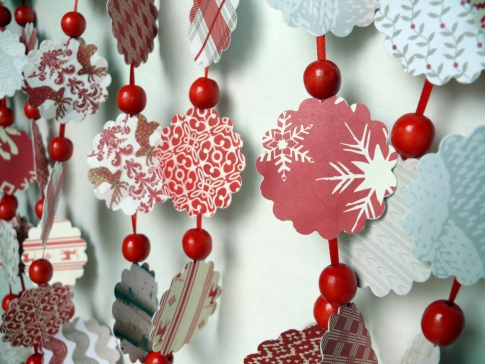
The beauty of such garlands is that they can be made even with children - together you will have fun creating crafts in the family circle.
Christmas wreaths
Christmas wreaths are gradually becoming an indispensable attribute of the holiday in every home - they decorate the doors of every room, the doors of cabinets and wardrobes. Such New Year's decorations, as a rule, are made by hand, putting a piece of the master's good mood into each product. Try and make your own Christmas wreath!
You will need a wide-diameter round base made of cardboard or wood, a long piece of shiny rain, and a brooch.
- Fasten the beginning of the rain at one end.
- Start winding the garland around the base - you can use a cardboard circle, a hoop, a piece of wire.
- Each new round of rain must be applied tightly to the previous one. Attach the second end of the garland next to the first. Decorate the joint with a beautiful brooch.
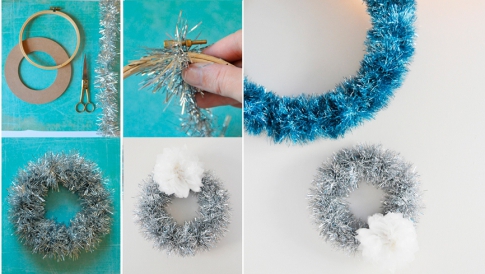
Ready-made wreath, created by yourself, hang on the wall or front door.
Another version of the master class is perfect for you if you are planning a children's New Year's party. You will need a large sheet of Styrofoam, a pack of toothpicks, and 1-2 kilograms of multi-colored gummies.
- Cut out a wreath blank from the foam sheet. Alternatively, buy a pre-made mold from a craft store.
- Take a toothpick and stick marmalade on it. With the other side of the toothpick, pierce the wreath blank.
- Arrange the candies as close to each other as possible so that there are no gaps through which the foam peeks through.

To completely decorate the room using DIY Christmas decorations, watch the following video tutorial - it will tell you how to decorate the table, window sill, window and cabinets.
Take it, tell your friends!
Read also on our website:
show more
We create a festive mood and decorate the house in a stylish and original way - we will make magnificent New Year's decorations with our own hands!
Any New Year's decorations made with a soul are unique, so to prepare for the holiday, all you need is a couple of free evenings, and a few inspiring ideas to create decorations for the New Year with your own hands. Moreover, for this purpose you need to use items that are probably available in every home. So let's go.
From balls for the Christmas tree we make cool New Year's decorations with our own hands
1. Balloon from a Christmas tree toy
It will require a beautiful Christmas ball, a piece of cardboard, a thick thread and adhesive tape.
From colored cardboard, you will have to cut a blank for the basket. This will be a small box. Its bottom should be such that you can put a coin in it for weighting. Glue it from the inside and attach the threads to the corners of the box with duct tape. It should look like a basket with two handles.
It remains only to collect New Year's decorations with your own hands. To do this, remove the mount from the ball, throw a thread through it and put it back in place.
2. Teddy bear.
To make it, a plain ball and cotton wool are useful. Glue will help shape the cotton balls. They also need to glue the parts together.
3. Nominal Christmas ball.
Leave an imprint of your own palm on a plain Christmas ball. Sign the date and keep for years to come.
4. Christmas garland of hearts.
The easiest Christmas crafts to make are DIY paper Christmas decorations. They are done in just half an hour. And there are a lot of ideas. A garland of paper hearts will look great on a forest beauty. It is made from strips of double-sided colored paper. You need to fasten the parts to each other with a stapler.
5. Ice cream - do-it-yourself creative decorations for the new year.
Cut out a circle from brown cardboard and divide it into two semicircles. Twist each of them into a cone. Glue well. From colored paper, form balls that attach to the cone. First pierce the top with a needle and thread.
6. Snowflake is a ballerina.
These decorations for the New Year are made on the basis of snowflakes. It is only necessary to cut out the torso of a ballerina from white paper according to the template and insert it into the center of the snowflake
Cool ideas for decorations for the New Year to make them from natural materials, such as thread. All thread crafts can be covered with sparkles or shiny varnish and they will perfectly decorate a Christmas tree or a house.
7. Toy - a horse made of paper and thread.
From the cardboard from the box, cut out two parts of the future toy. Fold them together and wrap tightly with thread or twine.
8. DIY Christmas balls from threads for home decoration.
Inflate a round balloon to the size that the finished decoration should be. Wrap it with thread so that the gaps are visible. Apply PVA glue to all threads. After drying, blow off the ball and remove it from the decoration for the New Year with your own hands. They can be hung in the room or laid out on a table with tinsel and candles.
9. Winter vase
It's a great idea to make decorations for the New Year from improvised materials. A beautiful bottle or glass vase will become magical if you draw a pattern of semolina on a glass surface. And you will immediately be transported to the land of the Snow Queen.
10. Garland of pasta
Such Christmas tree beads will delight children with their unusualness.
11. Toys for the Christmas tree made of wood.
Twig skates will give dad a job to do, and kids will love to color them.
12. Christmas decorations for the house from cones
A green-painted cone will become a Christmas tree.
13. Christmas funny gnomes
Unpeeled peanuts - an occasion to create funny little men out of it.
14. Snowman from socks.
From white stockings or pantyhose filled with millet, cute snowmen are obtained. They can be dressed in jackets and hats made of colored socks. And make noses from the core of an orange pencil.
15. DIY Christmas snowmen
Burnt out light bulbs - the basis for drawing funny gnomes that will decorate the Christmas tree for the New Year.
2021 is coming soon. How quickly time flies! But not only years are running away, but also hours, minutes, seconds. If you want to feel the approach of the New Year in advance, meet it without fuss and haste, start decorating your home right now. New Year's decor ideas are already in the air, and many of them can be suggested by children who will gladly take part in this pleasant and exciting process. Moreover, the children do not need to be urged, rushed, and you yourself can safely add something new every day and gradually bring the festive interior to perfection. You may have to buy something, but most of the decorations can be made with your own hands from what is in the house.

Color matters: the main tone of the New Year's decor
Recommendations for choosing a color scheme cannot serve as the ultimate truth. New Year's decor should harmoniously fit into the existing interior and only give it an elegant, festive look. But some tips may be helpful.

Green, the color of the needles, will be present in any case. To dilute it, you need to attract not the entire rainbow palette, but only two or three contrasting tones. It is better to give preference to New Year's colors - red, gold, silver. Saturated, bright shades of purple, blue, turquoise also look good.

You can arrange everything in one color scheme - this is a very effective and stylish option. Just don't forget compatibility. If the interior of the apartment is designed in cold colors, choose the appropriate range and silver, add gold and New Year's red to warm shades.


Several Christmas trees in the house - easy and simple
You don’t want to hang tinsel and garlands on the walls, and you don’t need to. But the New Year without a Christmas tree is not a holiday, so we will definitely set the forest beauty. Everything is simple here: we prepared a free place, audited last year's toys, determined what needs to be bought, and you can decorate the main one.


But, if you approach the issue creatively, you can not buy the missing toys, but make them yourself. And one more thing - in every room you can find a place for a homemade Christmas tree, and let the holiday be felt throughout the apartment at once.


Additional Christmas trees can be:
- - from beads, garlands, photographs,
- from improvised materials - wooden sticks, cones, pasta,
- - tinsel, rain, sweets and everything that comes to mind is glued onto the cone,
- knitted or collected from small balls,
- beautifully shaped branches with silver or gold plating,
- ordinary houseplants, properly decorated.
Only let the Christmas trees be not of the same type, but different in texture, shape and method of execution.


Now, toys. Made with love and imagination, they will turn your New Year into the warmest, most sincere and cozy holiday. You can wrap simple Christmas balls with shreds of fabric, knit clothes from colored yarn, paint them with acrylics, make compositions from cones, funny felt figures. Bake in the form of stars and Christmas trees with a small hole for the ribbon and hang it on the branches - both tasty and beautiful.


Decorate windows and doors
Windows are the eyes of the house, the door is the face. Let your apartment look at the surrounding world and welcome guests with joy.


Let's start with windows:
- place compositions of their branches, cones and candles on the windowsills,
- lay out and hang bright Christmas balls,
- cut out from plastic bottles or thick paper,
- make garlands of flags, funny figurines, Christmas socks.

If you are fond of or just familiar with this technique, create fabulous illuminated, magical figurines and winter scenes.


Doors are usually decorated with wreaths. Dream up, create your own wreath or improve an existing one. Everything goes:
- dried citrus slices
- winter berries - mountain ash, cranberries,
- cut flower buds,
- bright lollipops,
- corks, beads,
- cones, coniferous branches, ribbons,
- bows, tinsel, garlands.
A wreath can decorate not only a door, but also a wall, window, furniture or a chandelier. 


Christmas lighting and table setting
New Year is unthinkable without candles. Let there be many of them, make beauty with your own hands. Arrange white and colored candles in glass vases, glasses, ordinary jars, one-third filled with sea salt or red berries, wrap with cinnamon sticks, cover with green twigs.


A composition with live fire will come in handy anywhere, and especially in the center of a festive dinner. It is better to serve the table in the same colors that prevail in interior decoration. Each plate can be provided with the guest's name or a small wish card. Dishes to your taste, but it is very desirable to depict some kind of New Year's symbol on each.


Decorate your home with love, connect all the household and you will have a real pleasure. And also - a nice bonus in the form of quite tangible savings, since you can create all the New Year's beauty with your own hands. Happy winter evenings and Happy New Year!


The New Year is approaching. It seems that only recently we met the year of the Rooster, and soon the Yellow Earth Dog, the mistress of 2018, will take its place. And again, you need to prepare for the holiday, think over the menu, put up a Christmas tree, decorate the house for the New Year, do everything with your own hands. There is some element of routine in this, but you can also enjoy it.
Children especially love to do crafts with their parents. Pamper them, spend a few evenings decorating the house, create a magical atmosphere, then the approach of the celebration will be felt more acutely, and all worries and problems will recede into the background.
We decorate the house with garlands, transform the chandelier
Christmas decor doesn't have to be complicated. Simple garlands can also become a decoration. It doesn't matter what you make them from, plain paper, natural materials, or special materials bought from craft stores.
Cones in the New Year's decor
To make a garland of cones, you will need cones and twine. This is if you absolutely want to do without decor. But garlands of cones look very beautiful, on which bright bows of satin ribbons are glued. We will just make such a garland.
Vertical garland: stars
Most of us are familiar with horizontal garlands, which are easy to stretch between the walls of a room, they can be wrapped around a Christmas tree or hung along the walls, and there are other horizontal garlands. They fall from the ceiling like a waterfall. Let's make a garland of paper stars.
 |
Draw a snowflake on a piece of paper. The template is easiest to make on checkered paper. It is necessary to draw two lines intersecting at right angles. The segments from the center of the future figure to the edge should be equal. Then divide the Four Sectors with new lines exactly in half. The segments should be equal to the first or be slightly less. |
 |
Use the resulting template to prepare stars from decorative paper. |
 |
To make the star three-dimensional, it is necessary to bend the corners with the vertices in half in one direction, and fold the inner corners in half in the other direction. Don't try to do everything at once. First, just outline the folds, laying out the workpiece each time. |
 |
Tie a thread to the resulting star. |
 |
Having made several stars, you can decorate a chandelier with them. |
Video: eco citrus garland
Video: DIY fabric garland
You will find many more detailed manufacturing instructions.
Lighting workshop
It is not for nothing that on New Year's Eve everyone around is decorated with luminous garlands. On the one hand, flickering dim lights soothe, please the eye, on the other hand, create a festive atmosphere.
Decorative candlesticks
Candles are a special decoration. The flame of the candle radiates warmth, and the dancing of its small tongues creates an iridescent effect. There are a lot of options for decorating candles, and one of them is beautiful candlesticks. If you put a candle in a decorative candlestick, then a real festive entourage will be created. Let's make decoration in eco style.
 |
Roll plasticine into small balls. |
 |
Stick small spruce branches into these pieces of plasticine. |
 |
Trim the needles with nail scissors. |
 |
Decorate the branches with rowan berries, pricking them into needles. |
 |
Write a year with a brush dipped in glue or draw an ornament. |
 |
Pour artificial snow into a jar. Buy it at the store or grate the foam on a regular grater. |
 |
Install spruce branches inside. |
 |
Tie a ribbon to the edge of the jar. Use it to fix the rowan twig. |
If you have some acrylic paint and glitter, or just want to make a glitter candle holder, use the following tutorial - it's very simple.
In previous workshops, we used tall candles, but let's not forget that there are tea candles that also look good in homemade candlesticks.
Eco design option - orange or tangerine peel. The most important thing in the manufacture is not to damage the peel by removing the slices. You can make not only a hole on top, but also cut out small patterns in the form of hearts, monograms, snowflakes on the side.
Tea candles can float, using this property, we will make candlesticks with water, decorated with bare thin branches of deciduous trees.
creative lamp with silhouette
In one of our articles, we suggested making a New Year's decor on the windowsill with a silhouette of a winter city or forest. You can watch the master class. And now, according to a similar principle, we will make a lamp.
 |
You will need: corrugated cardboard, synthetic winterizer, glue, thermal gun, white paint, garland, preparation of a winter city from thick cardboard. |
 |
We will need 6 long blanks of the sides and 6 short ones. You can choose the size according to your preference. Glue each wall from three pieces of corrugated cardboard. |
 |
When gluing the front side, put a blank of the winter city between the layers. |
 |
When the base is assembled, paint it with white acrylic paint. |
 |
Make a slit to bring out the wire of the garland to be placed inside. |
 |
Coat the bottom edges of the box with hot glue and glue the bottom. Paint it white too. |
 |
Decorate the cardboard with sparkles (cover some areas with PVA glue first). |
 |
Place a piece of foil inside to bounce light off the walls and bottom. |
 |
Wrap the lamp with synthetic winterizer. |
 |
Tightly lay the electric garland inside. |
 |
Cover the top with a piece of synthetic winterizer. |
Window decoration - drawings on glass
Windows are decorated with a variety of materials: they make colored gouache patterns, stick paper snowflakes, vytynanki and other decor. We suggest decorating windows with toothpaste diluted in water to create a frost effect.
 |
Print and cut out several New Year's patterns of vytynanok. |
 |
Make a soap solution. You can just leave the remnants in the water, or you can cut the soap and fill it with water. Apply the solution to paper blanks. |
 |
Stick them on the glass. |
 |
Squeeze toothpaste into a container. |
 |
Add some water and stir. |
 |
Dip your toothbrush into the toothpaste solution. Swiping with pressure on the pile, spray the solution onto the glass. |
 |
Peel the paper off the glass. Enjoy the airy New Year silhouettes. |
Christmas wreath
Recently, for many, the New Year is also associated with wreaths on the door. Inspired by the wonderful decorations seen in Hollywood films, it is worth making a wreath for yourself, especially since you can decorate doors, walls, put it on the table, add candles and a wide variety of decor. Traditionally, a Christmas wreath is made from spruce branches, but more affordable pine will also make good products, you can even use ordinary branches of deciduous trees or make a wreath from improvised materials.
 |
To make a wreath, you need cones, plant branches, berries, |
 |
vine or thin branches, |
 |
burlap, ribbons, scissors, twine, glue gun, dried citrus fruits, |
 |
as well as wire. Roll the wire into a ring. |
 |
Wrap it with tape. |
 |
Secure the spruce branches by pointing the branches in different directions. |
 |
Then secure the vine branches with twine. |
 |
Glue a bow out of burlap. |
 |
Glue the bow between the spruce branches. |
 |
Then, using a heat gun, glue the cones. |
 |
Then the rest of the decor. |
 |
Hang the wreath on a wall or door. |
On our website there is a separate one, where you will find not only master classes, but also numerous photos of wreaths made by professionals and amateurs.
Christmas tree decorations: toys made of cardboard, salt dough, paper
The Christmas tree rightfully occupies a central place in the house prepared for the New Year's celebration. Recently, there has been a tendency to decorate Christmas trees with handmade products. Let's try and do something.
For example, wrap cardboard Christmas trees with twine and decorate with sequins.
 |
Freehand draw a Christmas tree template. Cut it out. Then make another piece of cardboard. |
 |
Glue them together with PVA glue. You need a thick base. |
 |
Lubricating the surface with glue, gradually wrap the toy with twine. |
 |
With an awl, make a hole in the top of the head and thread the thread. |
 |
Cover the top with glue. |
 |
Sprinkle with sequins. |
 |
When the glue dries, it will not be visible. |
Using the same template, or cutting out templates like in the photo, experiment with twine and acrylic paints.
 |
Prepare: corrugated cardboard, acrylic paints, PVA glue, pencil, twine, acrylic varnish, brush, half beads. |
 |
Let's translate the star and Christmas tree templates onto cardboard. |
 |
Cut out two trees. Let's glue them together. The toy should be thicker. |
 |
Now, in a chaotic manner, wrap the figurine with twine and attach a loop. |
 |
We will tear the napkin into pieces and, attaching it to the figure, cover it with PVA glue. |
 |
When the workpiece dries, paint it green. |
 |
We paint some areas with silver paint. |
 |
Then covered with acrylic varnish. |
 |
After the varnish has dried, decorate the toys with half beads. |
An independent direction of decor is crafts from salt dough. Create such decorations with your children. Salt dough is generally recommended to be used instead of plasticine, and manual work is very important for the development of fine motor skills. Even a product molded by children's hands, covered with golden or silver paint, will look cute and decorative.
 |
Salt dough crafts, covered with gold and silver paints, look like real jewelry. |
 |
Let's make cardboard stencils in the form of a heart, a bell, a dove, a Christmas tree, a crescent. |
 |
Roll out the dough, attach a stencil and use a clerical knife to cut the dough along the contour. |
 |
Round off the edges with your finger. |
 |
Then, with the help of any objects that leave behind an interesting ornament, we make patterns on the surface. |
 |
Using a brush, pierce the dough, making a hole for the lace. |
 |
Such beautiful ornaments were obtained with the help of buttons, a piece of lace, a net. If you glue large rhinestones, then attach them to the blanks, make recesses under them, just be sure to remove them before placing the figures in the oven. Dry the blanks in an open oven over low heat. |
 |
Sand dry blanks around the edges. |
 |
Paint some silver. |
 |
Others are covered with golden paint. |
 |
Glue on the rhinestones. |
 |
Scatter glitter over wet paint. |
 |
When the paint dries, cover the blanks with acrylic varnish. |
 |
Such toys are no worse than expensive Christmas tree decorations, rather, even better, because they are made by hand, which means they are unique. |
And about paper toys, in general, it is worth starting a separate conversation, because they are so diverse, and they are performed using completely different techniques. First, let's learn how to make a paper lantern, which, by the way, can also play the role of a candlestick.
 |
Stepping back from the edge of the sheet 1.5 cm, draw a line along the long side of the sheet. |
 |
On the opposite side, do the same. Put dots on the lines every centimeter. |
 |
Then take a clerical knife and, using a ruler, make a cut from the top to the bottom point. Under a piece of paper you need to put something solid so as not to cut the table. |
 |
Turn the sheet over to the other side and bend along the lines that we drew at the beginning. |
 |
Then start shaping the flashlight. You just need to glue the edges of the sheet. |
 |
If you put a flashlight on the table, it will already take on a convex shape, but you can increase the effect. |
 |
Glue a sheet of paper rolled into a tube inside, cut off the excess. |
Video: homemade Christmas toys
Video: decor for vintage Christmas balls
New Year's compositions
If you have free surfaces in your house on which you can put something voluminous, for example, tables, bedside tables. Install New Year's compositions there. And we will tell you how to make them.
 |
You will need a wide vase, a few pieces of oasis for floristry. Trim the oasis so that the pieces fit well in the vase. |
 |
Place the oasis in a vase, fill in the gaps with smaller pieces. |
 |
First, stick dry branches of about the same length along the edge into the oasis. |
 |
Then artificial decor. |
 |
If possible, you can add live plants. |
 |
Fill the middle with Christmas balls. Add small plant branches. |
 |
Decorate some areas with moss. |
 |
Put the composition where you can watch it often. It is possible that after a while the twigs will let out green leaves, and spring will come to your house. |
If the previous option seemed too complicated for you, we offer the idea of \u200b\u200bmaking a house out of cardboard and printed paper.
 |
First, prepare cardboard stencils (they will also serve as the basis). |
 |
Then transfer the stencils to printed paper, cut out with 1 cm allowances on each side and glue the cardboard base and the paper blank. |
 |
Cut the paper at the corners. |
 |
Apply glue to the edge of the cardboard blank. |
 |
Fold over the edge of the paper. |
 |
Here are the blanks. |
 |
We wrap a piece of cardboard (put it on glue) with paper with a print of “wooden boards”. |
 |
We prepare four cardboard blanks for window framing, cut out two strips from cardboard. |
 |
We glue each detail with printed paper. |
 |
On the reverse side of the part with a hole, we glue strips of cardboard crosswise. |
 |
We attach a rectangular piece of napkin on top. |
 |
Glue the parts with windows to the base first. |
 |
Then two other walls. |
 |
We decorate the joints with lace. |
 |
This is what the decor looks like from this angle. |
 |
Attach the roof with hot glue. |
 |
We collect a porch from the remnants of cardboard and also glue it with printed paper. |
 |
Glue. |
 |
At the bottom of the windows, roofs, we glue a little padding polyester, imitating snow. |
Christmas trees from branches: instructions for making
If you are an ardent supporter of respect for nature, and do not put up a Christmas tree for the New Year just because you do not want to support the massive cutting down of trees, we suggest making a Christmas tree from twigs.
 |
Purchase an oasis block from the flower shop. |
 |
You will also need: secateurs, knife, scissors, twine, thermal gun, planter, tinsel. |
 |
Decorate the cache-pot with tinsel. If you take a planter with holes, then put a piece of cellophane inside. |
 |
Place the oasis vertically in the planter. Trim corners if necessary. |
 |
Cut off excess cellophane with scissors. |
 |
Cut the top of the oasis in the form of a cone, but do not make it too sharp. |
 |
Remove the needles from the part of the branch that you will stick into the oasis. |
 |
Stick a small branch into the top of your head. |
 |
Fill the oasis with branches from the bottom up: the branches should be longer at the bottom, shorter ones above. |
 |
Decorate with lace, beads, Christmas decorations. |
And we will make another Christmas tree from bleached branches. To achieve this effect, it is necessary to soak the branches, peeled from the bark, in a solution of soda ash overnight.
 |
Let's make a Christmas tree in a marine style from branches. Collect and dry about 10-20 branches (depending on the desired size of the Christmas tree). Remove bark from branches. |
 |
Lay out in the form of a Christmas tree, i.e. Longer branches below, very short ones above. |
 |
Take the twine, tie a branch, make two knots, then tie the next branch and so on. |
 |
Repeat the steps on the other side. We make two knots so that there is a gap between the branches. |
 |
We make a loop. |
 |
Jewelry will be made of white beads. We string them on a thread and fix them with knots on both sides so that they do not slip along the thread. |
 |
We decorate with a starfish, glue it with hot glue. |
 |
Add a garland of beads and an LED garland. |
Video: Christmas tree on the wall from an LED garland
Other decorations (cardboard sequins, frame with pendants, letters)
Creativity is difficult to drive into some kind of framework, as well as to structure ideas in directions. In this section, we have collected a variety of decor ideas that you will definitely need if you are interested in custom decorating your home.
To begin with, we will make an imitation of a Christmas ball made of cardboard and sequins.
 |
Necessary materials and tools: cardboard, sequin braid, satin ribbon, glue gun. |
 |
Cut out a circle from cardboard. Drip a little hot glue into the center, fasten the end of the sequin tape and so gradually, circle by circle, glue the tape. |
 |
When the tape is glued, cut off the protruding cardboard. |
 |
Make a bow out of ribbon and glue on the edge. |
 |
Glue a snowflake to the center right away, because the middle, most likely, will not turn out very neat. |
Hang the decoration on the Christmas tree or fix it on the wall or mirror using double-sided tape.
Speaking of frames, they are widely used to embody the ideas of New Year's design. Even an old frame that you recently considered throwing away, but did not raise your hand, is easy to decorate and turn into a meaningful piece of furniture.
 |
You can decorate any decorations or Christmas decorations in the frame. |
 |
Tie strings to the decorations that will be placed in the frame and fasten them to the frame. This can be done with hot glue, small nails. |
 |
Paint the frame in the chosen color with acrylic paints. |
 |
Decorate the corner of the frame with a spruce branch. |
 |
Decorate with artificial berries. |
The latest trend in interior design is three-dimensional letters. They will come in handy if you are going to create an original holiday decor. In general, they can be purchased in the online store, but why buy if you can do it, because we decided to do everything exclusively with our own hands.
Video: how to make three-dimensional letters from cardboard
So, the letters are ready, now let's make them glowing. If you do not want to make volumetric letters from cardboard, regular corrugated cardboard from the packing box will do.
 |
Glowing English letters convey the spirit of American Christmas. |
 |
Delete the back of the letter. |
 |
On the outside, from the inside, mark the location of the light bulbs with a marker. |
 |
Poke holes with a screwdriver. |
 |
Line the holes with a pencil, inserting it from the front side. |
 |
Paint the letters red or another color. |
 |
Disconnect the garland. Insert the ball from the front side. |
 |
Attach the plinth on the back side. |
Papercraft: 3D paper volume
It does not matter whether you know what papercraft is and whether you know how to work with paper. The main thing here is patience, because you have to cut and glue a lot. We will create a simply delightful Scandinavian style deer head. All required templates are included. They are placed after the master class. The last 4 photos are templates for the horns. You can make them out of paper of a different color. Open each photo in a separate life-size tab and print. So, we arm ourselves with everything necessary, stock up on patience and proceed.
 |
To make this decoration, take colored paper, scissors, double-sided tape, glue, nail stick, ruler. |
 |
Print templates. Cut them out. |
 |
Now you need to bend all the lines. To do this, use a ruler and bend the lines, as shown in the photo, |
 |
or first push the fold lines with a hard, narrow object, in this case a nail stack. |
 |
Dots and dashes indicate inward folds. |
 |
One dash - bends outward. |
 |
Now we glue all the details according to the “number to number” principle. |
 |
Attach the deer's head with double sided tape. |
 |
Such crafts will create an indescribably festive mood. |
Deer head patterns


Perhaps some ideas will not be useful to you, something you will find difficult, but we hope that we have helped you decorate your home, create a New Year's atmosphere and now you are ready to celebrate the New Year.


