The decor of hair ornaments from year to year is becoming increasingly popular with fashionistas. A hairpin, a crab, a comb and an elastic band made of satin ribbons (made with your own hands) are indispensable accessories for all occasions. They are suitable for creating both romantic and playful looks.
For the manufacture of such crafts, it is widely used. She came from Japan and won the hearts of many needlewomen around the world. In ancient times, geisha loved to decorate their voluminous hairstyles with decorated hairpins. Their petals had to be folded in a special way, knowledge of which has come down to our time.
An elastic band from kanzashi satin ribbons can be decorated with flowers, butterflies and other decorative elements. Let's figure out in detail how to make petals, combine them into one whole and fix them on hair accessories.
Choosing a basis
Before starting work, you need to correctly select all the necessary materials. An elastic band from satin ribbons with your own hands should be created on the basis of the decoration most suitable for this purpose. There are certain rules for choosing rubber bands for decoration. The main tips include the following.
Pay special attention to the material from which the accessory is made. This is especially important for girls with long thick hair, because they need strong and reliable elastic bands that do not tear at the most inopportune moment. In addition, low-quality jewelry negatively affects the structure of the hair, making it brittle and weak.
Many girls prefer to buy stationery gum. They securely fix the hair and do not allow naughty strands to break out of it. But it is virtually impossible to remove such an accessory without pulling out a considerable tuft of hair. Therefore, it is better to abandon them when choosing material for work.
Another unusable option is roughly lined elastic bands with metal clips. They create too much pressure on the trunks of hairs, because of which they significantly damage the structure. Girls with dry and brittle hair should stay especially away from such accessories. An elastic band made of satin ribbons, made with your own hands, should bring joy, not suffering. Therefore, choose a softer and more gentle base to create it.

For example, silicone rubber is excellent for this purpose. You can make any decorations for her. It can be both transparent and matching the color of your hair. With its help, any hairstyle is quickly put in order, while the accessory is virtually invisible.
Despite all its advantages, this material has one significant drawback - fragility. You can perfectly decorate it, but it is unlikely that you will be able to enjoy the result of your creativity for a long time, since the accessory can break at the most inopportune moment.
Optimal choice
Another good option is rubber bands with a special hook. They come in a variety of sizes and colors and hold your hair perfectly without pulling out strands when you let your hair down. But they are very difficult to find both in the markets and in stores. If you are lucky enough to stumble upon such an accessory, take it without delay and boldly decorate it with ribbon crafts.
A simple, convenient and affordable option is ordinary rubber bands made from soft fabric. They are usually sold three per pack. They are easy to get, and they do not create problems both when decorating and during further wearing.
So, we decided on the rubber band. Now let's move on to choosing the rest of the materials. Depending on what decoration you want to make, you need to take the appropriate details. Consider some of the most popular master classes for decorating rubber bands with ribbons.
lush flower
In order to make this magnificent and elegant flower and decorate your hairstyle with it, you will need:
- satin ribbon of three shades of the same color (its width should be a quarter of a centimeter);
- one large bead and many small ones (it is desirable that they be golden or silver);
- ruler;
- Super glue;
- cardboard circle, 4 cm in diameter;
- scissors;
- the narrowest gift ribbon;
- and, of course, an elastic band to match the working materials.
Work process
Cut the satin ribbon of each shade into pieces of 10 centimeters. Make loops out of them by folding each piece in half and gluing the ends together. Then attach the cardboard to the elastic band and fix the finished petals on it. Place them in a circle, alternating between different shades. You can arrange them smaller or tighter - as you like.
Now cut the gift ribbon into 4 pieces of 12 centimeters each. Fasten the strips according to the principle of snowflake rays. Here's how to make an elastic band from satin ribbons with your own hands. The master class advises further to apply another layer of colored loops and cover them with another batch of shiny rays. This time, cut 8 cm strips and attach them in the same way as before.
Now we move on to the final stage of decorating. To decorate the core of the flower and at the same time cover all the joints from fixing the ribbons, glue a large bead in the center. And to give the craft extra volume and unusualness, decorate the ends of the strips from the gift ribbon with beads to match it.

We connect the leaves to the case
An elastic band from satin ribbons with your own hands can be decorated not only with a separate flower, but also with leaves for it. To work on such an accessory you will need:
- plain satin ribbon, a quarter centimeter wide;
- stripes of the same color, but with a pattern (they should be 1 mm larger than the main material);
- green ribbon (width - 0.25 centimeters);
- big rhinestone;
- a piece of glass;
- burner;
- iron ruler;
- Super glue;
- needle and thread;
- ordinary scissors;
- elastic band to match the main material.
First, a flower
Lay a satin ribbon and measure 5 pieces of 7 centimeters on it and cut them off using a burner.

Fold the strips in half and connect the ends of each of them so that you get triangular petals. Lay them on top of each other and glue so that each piece holds its shape.
Sew and pull the rays at the base so that beautiful oblong recesses appear inside them. Do this operation with each petal separately.
Lay out the elements in a circle and fasten them together with a thread. Pull on the ends and tie them tightly. Then straighten the resulting petals. You should have the first flower. A do-it-yourself satin ribbon elastic band consists of two or more such tiers, so let's move on to working on the next one.
Start working with a plain satin ribbon according to the same principle as in the previous scheme. But this time we need 7 cuts of 9 centimeters each. Lay the fabric on the glass, measure the desired number of pieces with a ruler and detach them using the burner.
Bend each petal into a triangle. Fasten the ends with glue and sew the base, tightening the thread tightly. Now gather them all together and securely tie them together. At this stage of work, your satin ribbon elastic band is almost ready. The master class, which describes the process of its creation step by step, further recommends merging the two layers together.
Now the leaves
Glue a flower with five petals on top of the one you just made and move on to creating the leaves. They are made according to the same principle as the previous elements. Cut 3 pieces of 15 centimeters from the green tape with a burner.

The tips of each of them should form corners. Glue each part of them, turn them inside out to the front side, and then combine three finished leaves into one composition.
Attach them under the lower flower, and attach a rhinestone on top, in the central part. When the glue dries, sew the craft to the elastic.
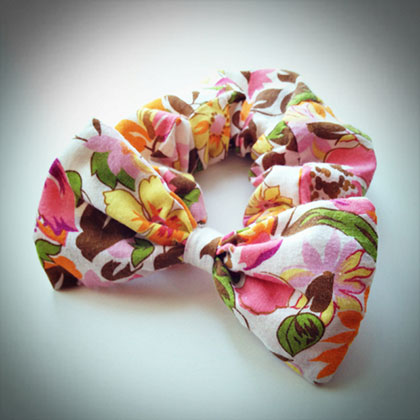
Bows: blanks
What else can be an elastic band from satin ribbons? The master class (instruction) will tell you how to decorate it with a bow. Make it even easier than a flower.
To work, you will need three types of tape of different widths: 3.3 centimeters, as well as 0.6 and 1.3. Each layer of the craft is made from a strip of a certain type. For the first level, you will need cuts of 18 cm each. For the second - 28 each, and for the third - 4 each.

Burn the cut edges of each piece with a candle so that they do not bloom. Now fold the widest ribbon in half, stacking the ends in the center. Sew the workpiece in the middle with a thread using small stitches. Pull it tight and wrap the bow a few times to get a better hold, and tie it off.
We form bows
Now take a ribbon 0.6 cm wide and form the same shape out of it, attaching it from above to the previous fragment.
After that, wrap the composition in the center with the remaining strip and connect its ends on the back so that they are not visible.

From the remaining cuts, make the same bow. Sew both decorations to the elastic bands. To make your job easier, you can pull the accessory over the deodorant cap. So it will stretch, and it will become much more convenient to attach decorative elements. An elastic band made of satin ribbons, a photo of which can be used as an example while working on new jewelry, is ready. Wear with pleasure!
For girls with long hair, an elastic band made of satin ribbons will be a great accessory. With their own hands, mothers can create many of these accessories. It is not difficult if you delve into the basics of several techniques for working with fittings. From the article you will learn how to make an elastic band from satin ribbons using the kanzashi technique, how to make a lush American bow. You will learn the intricacies of working with fittings by studying the master class. Elastic bands from satin ribbons do not happen much! Keep it up, you will succeed!
Satin Ribbons for Beginners
In this master class, we'll talk about how to make 2 elastic bands with bows for young princesses. To create a product you need:
- 2 satin ribbons 2.5 cm wide and 1 m long.
- Two satin ribbons 0.8 cm wide and 1 meter long.
- A piece of satin ribbon 8 mm wide and 0.5 m long.
- Decor for the middle of the bow.
Cut out two U-shaped pieces of cardboard, 6 by 8 cm. Cut off the tip of the large tape so that it becomes sharp.
Wrap it around the template so that the end and two folds are at each edge of the cardboard blank.
Fix the tape in the center with needles and sew. Use a forward needle stitch for this.
From thinner ribbons, fold two bows, connecting them into a ring. Lay one on top of the other and fasten. Do the same with the second item. Wrap the middle with a thin ribbon, attaching an elastic band at the back. Glue.
Elastic band on a bunch of satin ribbons
In this master class, you will see how to create an elastic band from satin ribbons. With your own hands, you can make a hair bun decoration. This accessory is especially relevant for little girls who are engaged in rhythmic gymnastics and dancing.
An easy option for beginners
In order to understand the principle of sewing such an accessory, we recommend starting with a simple decor. Prepare 5 small bows, following the recommendations of the previous master class.
Take a rubber band. It is convenient to use a blank with perforation. You can sew a button to it to adjust the size of the product depending on the thickness of the beam.
Cut out 6 circles from felt. Make 2 cuts in them for threading the elastic.
At the back we will have a large bow, decorated with a cabochon and rhinestones. For this element take:
- 2 pieces of satin ribbon measuring 5 by 28 cm.
- 2 satin ribbons 2.5 cm wide and 23 cm long.
Form two bows. Put the small one on top of the big one and fix it.
For the elegant ends of the bow, prepare two pieces of satin ribbon 5 by 10 cm. Cut the corners of the blanks obliquely so that the ends look symmetrical.
Gather the top of the ribbons. Sew the blanks together. Glue the ends to the back of the bow. Decorate them with rhinestones, rhinestone ribbon or lace.
Take a small piece of thin satin ribbon and wrap it around the bow, while grabbing the elastic in the middle. This way you will attach the largest bow to the base. You can decorate the middle of the decor with a cabochon or a small flower made of fabric or foamiran.
All parts on the elastic band for the beam are movable. You can disassemble the product and use the bows separately, putting them on the hairpins.
In a similar way, you can attach more complex decorations to the elastic band, for example, flowers with leaves created using the kanzashi technique. So we figured out how to make an elastic band from satin ribbons.
American satin ribbon bow
Prepare for work:
- Two satin ribbons 5 cm wide and 60 cm long.
- 2 ribbons 0.5 m long and 2.5 cm wide.
- Six grosgrain ribbons 12 cm long and 2.5 cm wide
- Four ribbons of grosgrain fabric, 35 cm long and 1 cm wide.
- Two rubber bands.
- 2 mugs made of felt or foamiran.
- Decor for the middle of the bows.
Tools that will be needed for work:
- sharp scissors;
- candle;
- needles and threads;
- glue gun or Moment Crystal glue
Scheme of work in stages
Take the two widest blanks and melt their ends over the candle. Close their edges into a ring. Make a bow from the blanks by sewing two pieces in the middle. Pull the thread and hide it. Do the same for the decor of the second gum.
Melt the edges of the rep ribbons as well. Sew a bow from the blanks.
Making flags
Now you need to add the resulting bows. Take six blanks and cut the edges as shown in the photo. Treat the corners with a lighter. The thinnest blanks are folded into loops.
All parts of the bow are ready. You can proceed to the assembly of the product. This must be done strictly in a certain sequence. Attach flags to a large bow. Sew the blank with threads for reliability.

Next, lay the loops of thin tape and also quilt with a needle. Lay the ribbon bow last. Sew and glue the product for reliability. Fix the decor in the middle of the bow.

Attach an elastic band to it, dropping a little glue, and close it with a felt base for reliability.
Lilac flowers in kanzashi technique
At the end of spring, we hide the hats of our daughters on the mezzanine. I want to decorate their heads with something cute. We suggest you make lilac flowers using the kanzashi technique for decorating rubber bands.
Making petals
Cut the satin ribbon 4 cm wide into squares. Take one and fold it in half to form a triangle.
We bend the lower and upper parts to the center to form such a figure as a rhombus. We bend it in half and get a petal. The edge of the workpiece must be compressed and melted over a candle or processed with a soldering iron.

Everyone knows that lilacs have four petals, but you can make those flowers that you were looking for for good luck - lilacs from five elements. Collect the elements with a thread and a needle. Glue in the middle of the rhinestone.
In order to shade the white lilac, we will make some green petals. Cut a 4 cm wide satin ribbon into rectangles. Their length should be 6 cm. Fold the element in half horizontally. On one side, cut off the tip with scissors and melt. Before singeing the edges, connect them together. The blank should come out as in the photo. Wrap the remaining tips in the opposite direction to the center. Melt and pin the end.

Glue a few leaves to the back of the lilac flower. Using a hot gun or instant glue, secure the elastic to the decor. Cover it with a circle of felt. Here we have such an elastic band made of satin ribbons. With your own hands, you can make headbands, hairpins, bandages with such decor. Hats, caps, belts, dresses are also decorated with flowers using the kanzashi technique, brooches are made from them, decor for caskets, mirrors, soft covers of wedding albums.

Small flower "Flower-semitsvetik" for gum
For very young girls, whose hair is not yet very thick, voluminous decor with elastic bands is not suitable. Mom for her crumbs can make accessories with small delicate and simple flowers.
Following the title, we will make a flower with seven petals. Prepare thin ribbons in seven different shades. For each petal, we need to cut pieces equal to 2, 3 and 4 cm. Melt the edges of the blanks with a lighter.
We sew blanks
Fold each piece into a loop. Insert all three parts into each other and sew. Similarly, collect all seven multi-colored petals. Straighten the workpiece. Tighten and hide the thread.
Cut out two circles from felt or foamiran. Stick one on the back of the flower. Put a drop of glue, attach an elastic band and close it with a second piece of felt. Similar flowers will also be an excellent decor for hairpins.
Hair bands made of satin ribbons are accessories that will come in handy in any situation. Girls should have a lot of them. Now you can independently decorate such an accessory as an elastic band from satin ribbons. With your own hands, create jewelry for every day and delight yourself and your daughters.
Spring has finally come, we are putting away outerwear and hats, and it will be possible to make different hairstyles for hair, as well as decorate it with beautiful hairpins, rubber bands, headbands, etc.
Let's try to make a chic elastic band decorated with satin ribbons and rhinestones.
In contact with
How to make an elastic band from satin ribbons: a master class
 Before work, we need to collect the following materials:
- a simple rubber band for green or white hair;
- sharp scissors;
- glue gun;
- thread and needle;
- ribbons of lilac and light green satin two centimeters wide;
- a thin satin ribbon of a light green shade 0.5 cm wide;
- green satin ribbon 5 centimeters wide;
- various rhinestones and beads for decoration;
- lighter;
- oblique inlay of snow-white color;
- green organza ribbon with a width of 2.5 cm.
Satin ribbon gum master class, description
 First, we create the main detail for decorating the rubber band - this is satin ribbon flower. We divide the ribbon of a lilac shade into segments six centimeters long. In total, ten such pieces will be needed. We solder the edges a little with a lighter so that they do not crumble. Fold the piece in half along the length and sew all open edges with a basting seam (we will not touch the fold line). We stretch the thread, thereby collecting the material with an accordion, and fix the thread. In this way, a petal is obtained.
Let's do the same with other segments and start collecting the flower. We roll the first petal with a tube and fix it with a thread with a needle. We will glue the other parts in turn with our gun. We cut a thin satin ribbon of a light green shade into pieces six centimeters long. You will need eight pieces in total. Fold in half and glue the edges together.
Glue all the elements to the back of the flower. From a satin ribbon of a dark green hue, cut out squares, the sides of which are equal to five centimeters (five pieces). We fold them diagonally so that at the end we get a triangle. Once again, fold everything in half and secure with a needle. Now fold the side edges to the middle on top of each other and sew together. Glue the leaves to the flower. We divide the organza ribbon into four pieces ten centimeters long. Fold the pieces in half and sew two together.
Let's glue everything. Then we take a piece of light green ribbon (two and a half centimeters wide) twenty centimeters long, we outline one of its edges along the length. Gather the ribbon with an accordion and sew the two open edges together. Glue to workpiece. Glue a rubber band in the middle. From a white oblique inlay, cut a piece five centimeters long. Glue the edges to the light green ribbon, passing through the elastic. In some places we add rhinestones and beads, and a great do-it-yourself scrunchie is ready for use !!!
Do-it-yourself ordinary rubber bands from satin ribbons: a master class
 For a pair of elastic bands, we will need the following materials:
- white ribbon with black polka dots 2.5 cm wide - 1.5 m;
- black ribbon with white polka dots 2.5 cm wide - 1.1 m;
- lighter;
- silicone glue and a special gun;
- four mugs of felt with a diameter of 3.5 cm and a small strip of felt;
- two rubber bands for hair;
- two centers for flowers.
For the middle of our flowers, you can take small beads or oval buttons. You can use rhinestones or sweets.
- Master class, description
First you need to do it yourself flower petals. A black and white palette is always popular, although you can choose a solid ribbon or two bright colors.
Two flowers will require 1.1 m of black polka dot ribbon and 1.5 m of white polka dot. It must be cut into segments of 6.5 cm.
For one flower, you need to create eight petals from a black ribbon with white polka dots and eleven pieces from a white ribbon with polka dots. It turns out that the segments should also be the same.
 To create a petal, you need to lay out the tape in a certain way. Then bend again to make a uniform triangle at the top. To fix the ribbon, it will be necessary to draw a lighter along the base of the petal. Since the fire will melt the ribbon, it will hold together well. Then the second. Petals will turn out to be quite a large number. We collect the flower on a felt circle. The first layer is made from dark petals. After that there are two layers of light parts. To tightly attach the flower to the accessories, that is, to the hair band, we need a circle of felt.
It will be necessary to make two small cuts on the felt and fix the rubber band using glue and a felt strip. And it remains only to glue the flower and the base. Elastic bands flowers from satin ribbons made by hand. Such cute and, most importantly, good hair bands can be made quickly and without much loss of money. So that the products do not lose their splendor, it is recommended to spray them with hairspray. Then the do-it-yourself flowers will become a little tougher and, accordingly, will last much longer. So we have finished our master class on creating beautiful rubber bands. You can also make gummies out of candy, but that's another story.
DIY hair bands


Kanzashi hair accessories are distinguished by their originality and attractiveness, ease of manufacture and low cost.
To make these beautiful satin ribbon elastic bands with your own hands, you will spend one evening. Delicate candy flowers are suitable for a girl with any hair color. You can also attach hairpins to the composition, and even more practical - make the mount removable and change it depending on the hairstyle being created.
What you need for the master class
For one candy gum or hairpin, prepare ribbon of different colors:
- 8 square pieces of mint 5 * 5 cm;
- 8 squares of pink 5*5 cm;
- 6 rectangles of white 2.5 * 7 cm;
- 2 pieces of narrow white 0.5 * 10 cm.
Also prepare accessories:
- the middle in the form of an appetizing candy;
- huggers silver bells - 2 pcs.;
- pink beads with a diameter of 0.8 cm - 4 pcs.;
- white beads with a diameter of 0.8 cm - 2 pcs.;
- 2 felt bases with a diameter of 3 cm;
- elastic band or clip for hairpins.

To fix the edges, you will need to singe with a lighter or candle flame. Be careful and follow the safety measures! For more information about the reception, see another publication on our website.
Modeling colors for elastic bands from satin ribbons
The choice of hardware color is dictated by the appearance of a wonderful candy-shaped center. Mint, pink and white ribbon will do. From pink and mint, cut out squares with a side of 5 cm, from white - rectangles 2.5 cm by 7 cm. Also prepare the rest of the accessories, adhering to a delicate pink and salad color ensemble.
To model diamond-shaped white petals, take rectangular segments. Turn the inside out towards you and bend the upper part to the right or left side at a right angle.

After that, bend the beveled corner so as to combine the two ends and get a blank in the form of a house. Turn the piece right side up and crease the bottom edge to create a diamond shape.

Prepare 6 white diamond-shaped petals with a fold in the center. And also cut out the felt circle-base.

Use pink squares with a side of 5 cm to model petals of a different shape, bend them diagonally.

Bend the resulting isosceles triangle in height. Then fold down the center of the longest side in the triangle. Bend the remaining sides, adjoin the corners to the fold obtained in the center, singe in this position with a lighter, cut off the excess to get an oval petal with a triple fold in the center.

Make 8 identical rose petals and prepare a second felt circle to fix the flower for the satin ribbon elastic band, as in the photo.

Menthol squares with a side of 5 cm also bend diagonally and later in height.

Make the petals the same shape as the pink ones. Form a fold in the center of the base of the square, join two sharp corners to it and solder.

Gather 6 mint petals into a flower on a thread. Prepare an unusual candy center for decoration.

String beads, bell huggers on thin satin cords and prepare one mint petal each. Thus, you will get brushes made in the same candy range.

Glue the middle and bottom layers of the flower onto felt circles - pink and white petals. Glue the candy to the top flower, and glue one mint petal to each brush.

Collect decoration from satin ribbons for an elastic band or hair clips. Glue a bright flower on a white layer, and attach a greenish candy blank on top. Glue the tassels on the laces from below. Immediately make a couple of charming hair clips for the girl, you are unlikely to get by with one piece when it comes to such wonderful and necessary accessories.

Glue the elastic on the back of the composition of satin ribbons with hot glue.

Many more step-by-step master classes on making do-it-yourself hairpins, headbands and hair bands from satin ribbons and other materials are waiting for you on our website, and kanzashi instructions have been collected. Do not be afraid to create, even if the first time it doesn’t work out the way it does in the photo of the craftswomen, everything comes with experience!
Take a look at the site "Women's Hobbies" and find yourself a new activity for the soul, relaxation and good mood!
A universal selection of gift ideas for every occasion and occasion. Surprise your friends and loved ones! ;)
Hello! My friends, although it is not spring yet on the street, the time is not far off when we will all walk around without hats. It is worth taking care of how your little head will look in advance, especially if you have very long hair. That is why today we will make hair ties with our own hands!
We will move, so to speak, from the most elementary to something more complicated. In any case, you will definitely cope with all types of these rubber bands, because I will describe in detail how to make each of them.
In fact, there is simply an incredibly huge number of ideas for creating rubber bands (and not only). And almost every one of them can be realized with the help of simple manipulations. In general, I will show you a lot of hair accessories. Make yourself comfortable, I will open the door for you to the amazing (actually!) world of hair accessories (no matter how strange it may sound :))
Before you get started, take a look here. Come back when inspired :)
Scrunchie base or the simplest model
In order to make the base, you will need first of all:
- underwear or just a thin elastic band (15-20 cm);
- a piece of fabric (the length is about 2-3 times greater than the length of the elastic band, the width is arbitrary);
- threads in the color of the fabric;
- needle;
- pin;
- scissors.
Take the prepared piece of fabric, fold it in half lengthwise, sew along the edge. Then fold the stitched piece with the holes facing each other and sew along the edge, leaving an opening to turn inside out. Turn out the workpiece.
Now insert the rubber band. Tie it up, sew up the hole. That's all. Such a model can be used as an independent product or as a basis for a more sophisticated elastic band.

DIY hair bands: master classes and photos
How many rubber bands can be made, you simply cannot imagine! Now let's look at the options for elastic bands that can be made without even having serious knowledge in the art of sewing.
Four Variations
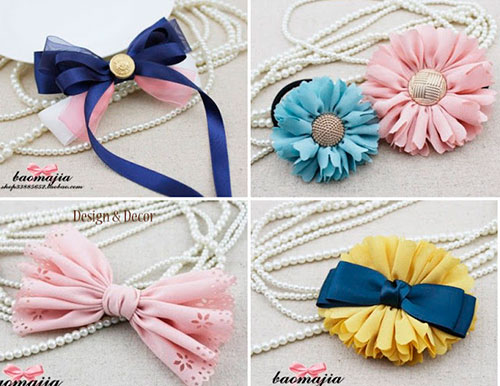
To plunge into creativity right away, I suggest you look at these four options for rubber bands. One way or another, you can find each of them in my articles about homemade gifts. At the end of the article, I just give links to those master classes.
In short: bows are made with multiple folds. In the first case, several ribbons are folded, and in the second, the folds are formed from one strip. The flowers are assembled from a heavily gathered ribbon glued to a base circle. In the latter case, a bow is also placed on top.
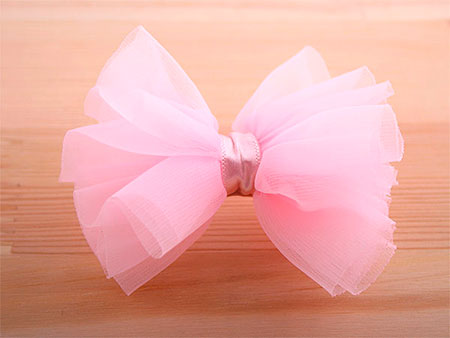
Here is another version of the bow:
Beautiful and fashionable
I see this model very often now. Want to be the center of attention? Then make this beautiful and catchy hair band. Prepare a piece of fabric, wire, warp and thread with scissors.
Cut out two ovals from the fabric, which are sewn together along the edge, leaving a hole. Put a wire in there. Place the future bow in an elastic band and tie.

elegant
It is not a shame to wear such an accessory for the evening. For it, prepare the base, shiny (optional) yarn, various kinds of beads and a crochet hook (although if the yarn is thick enough, you can handle it with your hands).
The most important thing here is how to tie the base. I don’t know what this type of strapping is called correctly, but it reminded me of a voluminous looped seam. In the course of weaving, gradually add beads (this can be done later by pulling a thread through the elastic band, gradually stringing them on it).

Children's rubber bands for little girls
A five-leaf flower can be created by a simple operation: take a circle, sweep it along the edge, pull it together and stuff it. At the end, sew up and make a few tightenings from the center. 
Such flowers are very fond of attaching to bandages for newborns and, in general, for small children. Take several circles of different sizes, cut them along the edge and burn them. It remains only to fasten in the center with a bead.

Button happiness
Are there a few original buttons that are definitely not useful for clothes, but do not give rest to your creativity? Then let them go! Everything is as easy as shelling pears: take an elastic band, a button and sew one to the other. If the buttons are small and the base is wide, then you can simply make a button decor.
All sorts of additional decorations are welcome: ribbons, rhinestones, etc.

Lace elastic
An elastic band can be sewn in the same way as the basis for an elastic band, but with one difference: after stitching, the woven blank does not turn out. With the help of lace, a very light and playful look is obtained.

The second option is with lace: this time only a flower is made from this wonderful material, and not the entire elastic band. To do this, it is enough to pick up the lace and sew it in the center, the rest is a matter of decor.

Elastic band "Bow"
An elastic band with a bow can be sewn from absolutely any fabric! I decided to experiment with fur
Below I decided to show you on the diagram how I made the bow. First, you make the base for the elastic band, and then for the bow, take a wide strip of fabric, sew it in half (as well as for the base).
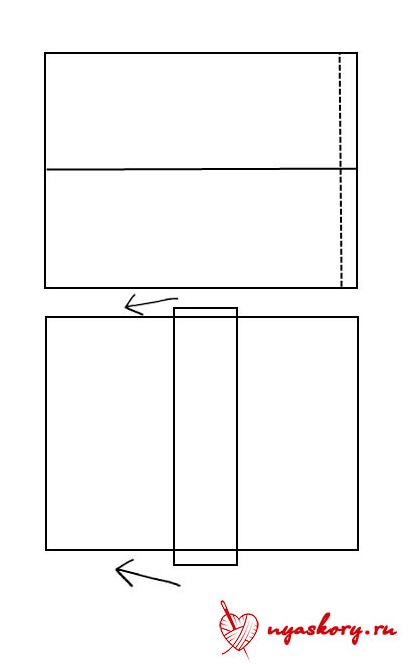
Then sew the ends of the bow, folding the workpiece in half again. Turn the elastic inside out and tie it in the center with a strip of fabric.
It turns out this cuteness:
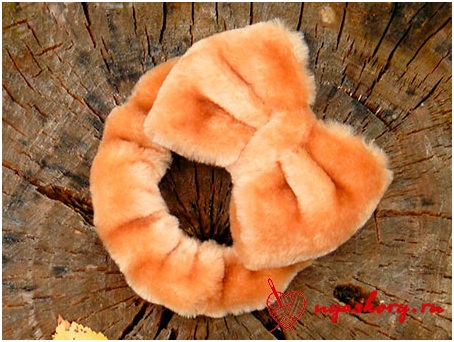
From ordinary cotton fabric, you get the following:
Elastic band "Hare ears"
Somehow I wandered into a free master class as part of the BiblioTime project (I talked about it). The topic of the handicraft meeting was rubber bands. But if everyone decorated the cut with beads, then I decided to excel, remembering the “eared” specimens.
Unfortunately, I don’t have photos of that product, but I can tell you about the creation of an elastic band with ears
To make such an elastic band, you will need a pattern:

Again, you need a base for the gum. The ears are tied with a knot around her and a romantic and girlishly gentle image is obtained. What you need for spring

Elastic band "Jack" ("Halloween")
I think many watched the cartoon "The Nightmare Before Christmas" by Tim Burton. As for me, the work is specific, but very bright and memorable.
Especially the main character is Jack Skellington, who you see below.


