How to sew or make a brownie from fabric, burlap, stockings, pompoms or cones. Detailed master classes with photos.
People believe that peace and happiness in the house, whether it is a city apartment or a village estate, is guarded by a brownie. No one has ever seen him, no one knows exactly what he looks like and in what hidden corners he hides. But everyone understands that if you respect and love the brownie, he will take care of the well-being of each family member. In order for the brownie to understand that he is loved, people create amulets in the form of brownie dolls.
Domovoi Kuzya do-it-yourself: master class
For many people, such a doll is associated with the brownie Kuzey from everyone's favorite cartoon. Cartoon Kuzya became so popular that the production of toys and amulets of this doll was launched. But, buying a standard multi-circulation toy and making it yourself are two big differences. Only a brownie that you made yourself, in which you put your soul, thoughts and feelings, can become both a favorite toy for children and a talisman at home.
Domovenok Kuzya do it yourself
The master class that we offer you is not the easiest: a rather complex pattern is used, to draw a face you need to have basic skills in fine art, and to make bast shoes you need the ability to knit. However, the result is worth it, and such a Kuzya brownie will surprise you and your loved ones with its originality.
 Unwashed brownie Kuzya
 Brownie Kuzya: materials and devices that are needed
You probably already understood that this brownie Kuzya is sewn from fabric. For sewing, it is better to choose beige cotton fabric . If you take a stretchy fabric, it will not bulge at the seams. Cotton works better than synthetics, because it is better for paints and blush, which are needed to paint a face. So, to make a brownie with your own hands you will need:
- Beige fabric
- Variegated fabric for the shirt and dark fabric for the trousers
- Synthetic winterizer or synthetic winterizer for stuffing
- Twine rope to tie bast shoes and knitting needles
- hair yarn
- Acrylic paints and brush
- Colored crayons or blush with shadows to give a face
colors - Large shirt button
- Spoon, key or other accessories of your choice
- Threads, needles and other standard sewing accessories

 Materials and fixtures that are needed to sew brownie Kuzya
 The pattern for the brownie Kuzi is shown in the figure below. It can be transferred to paper using a printer.
- The head will be sewn from wedges, so it will turn out to be voluminous
- The patterns of the remaining parts are simple, without grooves.
- We transfer the pattern to the fabric, cut and sew the blanks
- Turn the blanks right side out and stuff with padding polyester
- Now you can draw eyes and a mouth on the head, sew hair
- The nose in the form of a ball is sewn on after the paint has dried.
- We sew all parts of the doll, dress in a shirt, pants and bast shoes
- Kuzya is ready!

 Pattern brownie Kuzya
 Pattern of a shirt and pants brownie Kuzi
 - To sew clothes for a brownie, we need one more pattern
- We also print it out and cut it out with scissors.
- The shirt and pants will sit loose, so they are slightly larger in size than the brownie himself.
- In the cartoon, Kuzya appears unwashed and clean. You can make one or the other version of the toy

 Do-it-yourself grubby brownie Kuzya
 Do-it-yourself doll amulet from burlap: pattern
Handmade burlap dolls, despite their seeming unpretentiousness and simplicity, invariably evoke a feeling of admiration. They connect our present with the distant past with an invisible thread. In this past, bread is cut by hand with a scythe, on a hot afternoon they drink cool bread kvass, and children are fed with fresh milk.

There, in this past, children play with rag dolls, which mothers could make in a couple of minutes by rolling a few scraps of cloth. Perhaps that is why our genetic memory returns us to simple burlap toys. You can make a brownie doll according to the principle of sewing small parts onto a bag, symbolizing the head and torso.


The pattern for a burlap brownie is very simple:
- You need to make a rectangle that will be the head and torso
- Then cut out the details for the hat and legs.
- The beard and mustache are made of thread. Sew them on last.


There are a lot of housekeeping options that can be sewn with this pattern. We will describe in detail how to make such a brownie, as in the photo below, with nylon handles and frowning eyebrows. And you, depending on your wishes, can add or remove small details yourself.

So, to make such a brownie you will need:
- A new bag or piece of burlap
- Sintepon for stuffing
- A small piece of cardboard to stiffen the legs
- Nylon stockings for handles
- Thin copper wire that bends easily to make a frame for the arms
- White plastic and blue and black paper to make eyes
- Variegated shirt fabric
So, let's start sewing toys:
- We cut out a piece of burlap of the desired size, for this brownie a cut of 20 by 85 cm was taken, but the size may be different, the main thing is to observe a proportion of about 1 to 4
- We fold the burlap in half and sew on the sides, round the bottom corners a little
- We dissolve the upper edge, from the threads that remained on the workpiece we will get hair, and from the threads that we pulled out we can make mustaches and eyebrows


- To make a beard, mustache and eyebrows, we tie the bundles of threads in the middle, and then trim the edges with scissors.
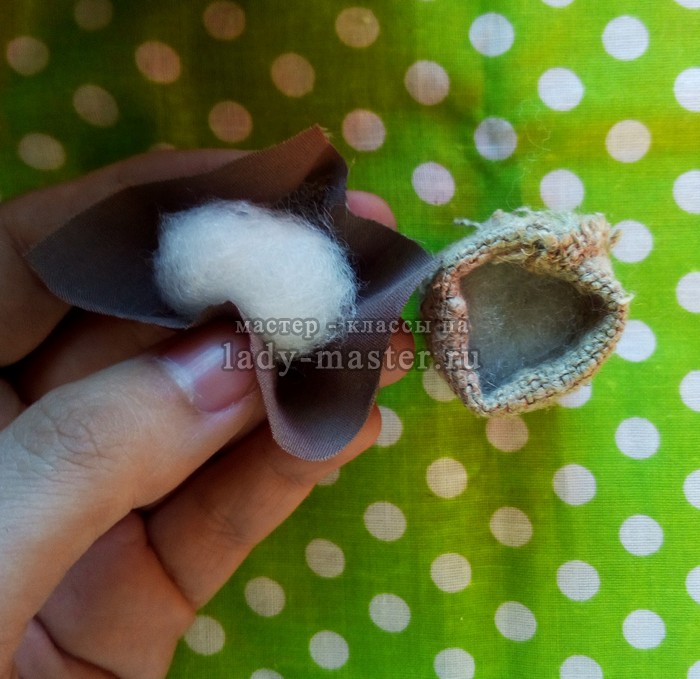
- In order to make a nose, we cut out a circle from nylon tights and overcast it with a thread along the edge, then put a piece of padding polyester in the middle and tighten the thread.


Again we take up the manufacture of the head and torso:
- We sew the edge with loose threads with a strong thread so that it does not unravel further
- We make one more seam to separate the head from the body.

- We fill the workpiece with synthetic winterizer and tighten the threads

- For the peephole, cut out blanks from plastic and colored paper
- Glue them together with glue
- We make a frame for handles from wire


- Wire blanks for handles are carefully wrapped with padding polyester
- Then we cut out two rectangles from kapron
- We wrap the brush with nylon and fix the fabric by tying it with a thread on the wrist
- We take a thread with a needle and sew the connections between the fingers
- After that, we make the rest of the handles: we wind a little padding polyester on the wire and sew up the capron


This is how the blanks for our burlap brownie will look like at this stage:


- For the legs, cut out 2 pieces of cardboard
- We cut out two of the same parts from burlap, a little larger. One of them is simply glued to the cardboard, the second is stuffed with padding polyester and glued to the cardboard only after that
- The two pieces are then sewn together.
- The seam, if desired, can be decorated with a pigtail woven from threads
- The legs are attached to the body with a good glue.

- Now all the basic elements of our brownie are ready and you can start making clothes and accessories.
- In our case, the brownie has a shirt and a hat


- We fasten all the parts together with glue and admire the result


If it’s difficult for you to work with nylon, then the brownie’s handles can be made from burlap threads braided into pigtails, and the spout from a piece of wood.


Do-it-yourself doll amulet from nylon tights
Dolls made of nylon tights are very similar to people and therefore even scare a little with their realism. Those who are not afraid to put such a doll at home can make it with their own hands. The principle of making a doll is to stuff nylon blanks with a padding polyester and manually sew them together with puffs on the doll's face, arms and legs.

To make a brownie out of stockings you will need:
- Nylon stockings, tights or socks
- Sintepon for stuffing
- Wire to make doll handles
- round nose pliers
- Sackcloth
- hair yarn
- Spikelets and artificial flowers for decoration


Let's start making a doll by making handles. For them we need:
- Wire
- Two square pieces of nylon
- Sintepon
- We bend the wire with our hands so that we get five fingers
- Curves can be made more even with round nose pliers

- After that, we press the fingers with round-nose pliers so that they are not too thick.
- Then the free ends of the wire are twisted together and cut to the desired length.

- We wrap each finger with a padding polyester

- We fit the workpiece with nylon and fix the fabric with a thread on the wrist
- The fingers are separated by seams

You can learn more about how to make hands for nylon dolls from the video below.
VIDEO: How to make hands for kapron dolls - a mini master class
Now that the hands are ready, you can start making the head of the brownie:
- We tear off several pieces of synthetic winterizer: one large one for the head, two smaller ones for the cheeks, one for the nose and the smallest one for the lips
- We take a piece of synthetic winterizer intended for the head, give it the shape of a ball and tightly fit with nylon
- Then we insert the lumps intended for the cheeks, nose and sponges into place
- With the help of puffs we form the nose, cheeks, lips and eyes

VIDEO: How to make a brownie out of nylon tights?
Make the body for the doll from fabric:
- Fold a rectangular piece of fabric face inward, sew it on the sides, turn it right side out and stuff it with padding polyester
- The head, legs and arms are sewn to the body by hand.
- Clothes for a brownie can be made in the form of a frock coat
- Measure your doll's bust, divide by 2, and add a seam allowance. So you get the size of the blank for the frock coat along the chest line


How to make a brownie out of thread and cardboard with your own hands?
- If you sew eyes, ears, arms and legs to a pom-pom made of knitting threads, you can get an original brownie toy
- Threads fit any: plain, multi-colored or variegated
- The eyes can be decorated with buttons, and the arms and legs can be cut out of colored cardboard or plastic bottles.


If you take a lot of threads, then the brownie will turn out to be voluminous, and it can be placed as an independent toy. If long threads are wound on cardboard in 2-3 layers, you will get a fairly flat brownie, which will need to be glued onto a cardboard base. A detailed master class on how to make an application with a brownie in the video below.
VIDEO: How to make a brownie out of thread and cardboard?
Brownie from a bump: crafts for school, kindergarten
To make a brownie from cones, you can use dried leaves, twigs, acorns and other natural materials.
- The hair of such a brownie can be wood shavings
- Headdress - acorn hat
- And the beard is a piece of fur

You can make a brownie out of a cone as shown in the figure:


The brim of the hat is made of paper, the basket is also made of paper.
A brownie made from a cone can look very realistic and fit harmoniously into the natural landscape.


Do-it-yourself brownie from salt dough
Figures from salt dough are molded in much the same way as figures from plasticine. With the difference that dried figures from salt dough are subsequently painted by hand with paints. Modeling dough is made from water, salt and flour.
For half a glass of medium-sized salt, you will need a glass of water and flour. Mix salt and flour and knead elastic dough
If the brownie is voluminous, start working with the details that are at the base of the picture.
VIDEO: How to make a picture from salt dough?
- Small facial features, the shape of the eyes, details of clothing can not be molded, but cut out with a thin knife. As it is done when carving wood
- After the modeling is completed, the product must be dried and painted with paints.
- When the paint is dry, give the figurine a shine by covering it with a colorless varnish.


VIDEO: Do-it-yourself brownie from burlap
For centuries, we have been accompanied by various talismans and amulets. Our ancestors used magic items to protect themselves from evil spirits and evil spirits. The ancient Slavs made magical things with their own hands. Thus, they strengthened their power and action.
Homemade crafts accompany us throughout our lives. They attract well-being and prosperity to our house, protect us from evil spirits, purify the space and make our life bright and happy. Each such craft has its place and performs the functions assigned to it.
Hand-made talismans to this day do not lose their relevance and remain as popular as they were several centuries ago.
Today, one can notice a significant increase in interest in the culture of the ancient Slavic peoples. Entire communities are being created that live a Slavic way of life. They cook food on the stove, just like many years ago.
They also revive the ancient culture: they make magical talismans, amulets and crafts with their own hands, embroider clothes with special ornaments. They are made from various items: clay, wood, metal, stones, burlap, dried herbs, and so on.
How to prepare for making talismans with your own hands
It should be noted that any do-it-yourself crafts always look quite original, unusual and beautiful. But in order for the amulet to acquire magical power, you need to follow some rules:
- In no case do not start making a talisman in a bad or depressed state. Your poor health can be transferred to your magical craft. You must have a desire to make this craft. You should not start work under duress or as a result of persuasion. Do the craft with all your heart, putting your soul into it.
- If a magical talisman was presented to you, pay attention to the donor. This gift will be useful to you only if it is presented to you disinterestedly.
- Avoid the use of cutting and piercing objects. Some products that are made by hand do not tolerate the use of these items. They absorb negativity and can invite trouble.
- If there are knots on your talisman, there should be an odd number of them. If necessary, each of them you can speak with conspiracies. They can be aimed at good luck, health, well-being, or simply protect you from evil spirits.
If you follow these rules, your craft will not only be beautiful and original, but will also serve as a protective amulet.
How to make magic crafts from dough
Sufficiently strong and durable can be products from a special test. It is kneaded in a special way. Such dough was made by our ancestors - the Slavs. They fashioned various figures from such dough, decorated them with herbs, cereals, stones and other items. Ready-made amulets were placed in various places of the dwelling and thereby protected him and himself from evil spirits and evil spirits.

To make a magic dough, you will need three ingredients: for two parts of flour, you need to take one part of table salt and add a little water to them. Next, you need to knead a thick, but elastic enough dough. Give the dough a little "rest", and then get to work.
From the resulting dough, you can fashion any figure. Often dolls and angels are fashioned from it. It all depends on your imagination and the further purpose of your amulet.
When your figurine is ready, it must be placed in an oven preheated to seventy degrees for about three hours. If you do not have such an opportunity, it can be placed on the windowsill. But such a procedure will require much more time from you. Most often it takes three to four days.
Next, your figurine needs to be decorated. Take a brush and paints, draw beautiful patterns or ornaments. You can use fabrics, this is the case when you make a doll. You can make a dress or a sundress from burlap. Decorate it with ribbons and beads. Your craft is ready.
How to make a brownie out of burlap
Making a brownie out of burlap is not difficult. To do this, you need to prepare the following materials: a piece of burlap, filler for a brownie, flax twine, thread or ribbon, eyes for a brownie, linen tow, a brush, cereals for decoration, glue, a thermal gun and glue for it, various small details for decoration .
By itself, a piece of burlap is a symbol of prosperity, wealth and prosperity among the Slavs. It is always associated with warmth and comfort in the house.
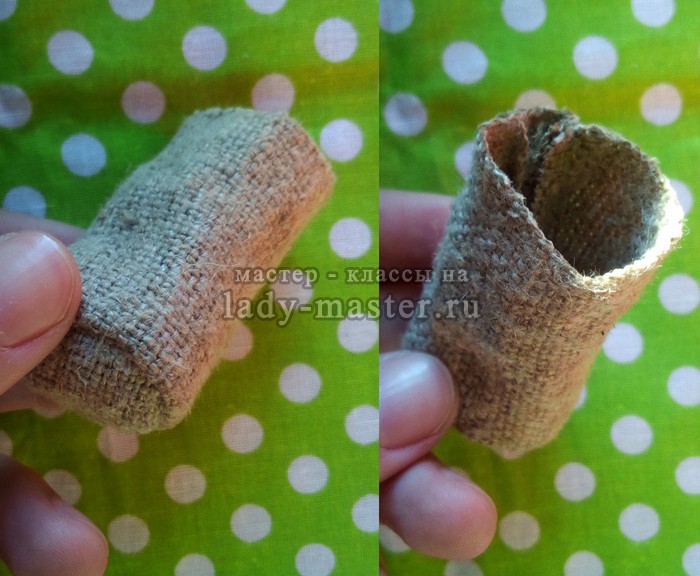
For a brownie, you need to sew a small burlap bag. Its size can be varied. It can be both big and small. It all depends on what size your magic talisman will be. We carefully sew all the seams, leaving no holes. Through them, your family happiness can escape. Turn the bag right side out.
Next, you need to make hands for the brownie. Weave seven threads or ribbons into a pigtail equal to the length of the brownie's hand. And then weave another pigtail - the second hand. Tie the ends of the rope on both sides and align the length of the threads. Using a pencil or ballpoint pen, make small holes in the area where the hands should be. Insert your hands into the prepared holes and secure them.

Fill the bag with any stuffing for toys. In addition to the filler, various herbs can be added to it, both for aroma and for magical purposes. Tighten the top of the bag as tightly as possible.
Now you can start making brownie hair. Take a herbal brush and attach it to the head of your talisman. If you do not have such a brush, you can make hair from twine. It will turn out well. Using a heat gun, you need to glue the hair to the head. Trim the resulting hair with scissors.
Make brownie bast shoes from dried corn leaves. Use a glue gun to secure.

Make a hat on the brownie's head. It can also be made from a leftover piece of burlap and secured with glue. Be sure to attach to him a mustache from tow. To do this, rewind it more tightly in the middle, shape them and glue them with glue. Make a brownie's face. Glue on his eyes, stick lentil halves instead of a mouth, beans or a small nut instead of a nose.
To make him thrifty and more homely, sew him some small bags. Stuff them with various cereals or herbs and fasten them on the brownie's back.
Decorate the brownie to your taste. The more abundant and varied it is decorated, the more benefits it can bring to your home.
Charms, talismans and various crafts are easy to make with your own hands. In this case, you will need a little patience, time and desire. Do the work in a good mood and be sure to believe in a miracle, and it will definitely happen.
Brownie is a very cute amulet. In addition, you can make it yourself and give it to friends. It is known, after all, that grandfather (so called brownie) has been in the house since ancient times, and his magic has been tested for centuries. Our ancestors believed that a brownie made with their own hands has a special magical power. This is a good spirit, and therefore they also call him a well-wisher.
Burlap brownie
Whatever material you make the amulet from, it must certainly be cute. Then all household members will be pleased that this symbol is next to them. It is believed that he looks like the face of the owner of the house. So if you have artistic talent, you can convey "photographic accuracy".
Our ancestors most often settled brownies in the part of the house where they cooked food. In a modern apartment, he will perfectly "register" in the kitchen, but you can also find a cozy corner for grandfather in the living room. And prosperity, well-being and harmony are provided to the family.
- Keeper of the family hearth. He is responsible for maintaining harmony and harmony among the household, keeps order and protects the house from the machinations of evil spirits.
In his appearance, he resembles a short old man with a long beard, button eyes and shaggy wheat-colored hair. The brownie is most often dressed in large worn-out bast shoes, a cap or a straw hat, trousers with patches and a bright spacious shirt.
What is it for?
Often people endowed the brownie with a mischievous character and a stern disposition. It was believed that the stronger the mess in the house, the angrier the brownie would be. The hostility of the spirit to the owners can be expressed in frequent conflicts and quarrels between family members, broken dishes for no reason, aggression from pets and a heavy negative atmosphere in the house.
There are beliefs that say that a brownie can try to strangle a careless housewife, not to death, but rather to scare and force more zeal to be applied in housekeeping.
But most often this old man had a good-natured character, sometimes he did little pranks and adored pets. The ability to protect the house and its inhabitants was considered the most important magical gift of the brownie. from negative energy and evil spirits.
Recently, it has become very popular to make small figurines and figurines in the form of a brownie and put it in the most prominent place in the room, thus wanting to appease the spirit, attract prosperity and love to the house and protect yourself and your loved ones from problems.
Next to such an amulet they put a small bowl of milk, put a treat on a plate - candy or gingerbread. And on the day of the brownie, February 10, a glass of vodka was poured to the keeper of the house. Of course, the magical old man will not eat the food itself, so do not be surprised when you find it in the same place where you left it, safe and sound.
Brownie feeds on the spirit and energy of food. That is why you should not eat up or finish drinking the treat left for the brownie. Give the dog treats and throw the drink outside.
It is generally accepted that if the house is clean and tidy, the hostess regularly treats and appeases the spirit, then harmony and love will reign in the family. In such a house it will always be pleasant to spend time, there will be prosperity and well-being in it. Do not be lazy and get yourself as a small brownie.
But the best amulet will be a figurine made with your own hands from improvised materials. Thus, you will nourish it with your own vitality, make the necessary energy installation and just have a good time. Amulets-domovyata, made by a person on their own, do not require additional activation of magical energy.
Brownie from burlap at home

The most important detail that needs to be considered if you decide to make a brownie amulet with your own hands and from improvised materials is that you should start this in a good mood and in good health. Do not do this if you feel unwell, however mild, or if you are angry and irritated.
Thus, you will transfer your mood to yours, and its protective properties will manifest themselves far from the way you originally wanted. For, To make a brownie out of burlap, you will need to stock up on the following materials:
- synthetic winterizer
- a pair of buttons or decorative eyes
- linen tow
- glue
- a piece of burlap
- twine
- model of vegetables and fruits
- dried plants (St. John's wort, straw, some hay)
Now consider the process of making a talisman:
- Take a piece of burlap and sew a small bag out of it.. Its size will correspond to the size of the entire amulet, keep this in mind when you make a cut. For a small brownie, the material in which wine bottles are wrapped is perfect, it has a beautiful texture and is dense enough to hold its shape. When you have sewn three sides of your bag, turn it inside out and straighten the corners.
- Now the bag should be filled with padding polyester(you can use cotton wool, hay, fragrant filler or sawdust). Make holes on the sides where you insert the hands of the brownie. Weave two braids from twine (can be replaced with knitting yarn) or the remaining strips of burlap - the handles are ready. Thread them through the holes and align on both sides.
- We pass to the head of our brownie. To make the crown, step back from the top of the bag for about a couple of centimeters and pull it tightly with threads. At the crown you need to attach the hair. It is also made from braids of twine or fluffy yarn. Drop glue on the dome and attach the brownie to his new hairstyle.
- Bast shoes can be depicted from twisted corn leaves or all the same burlap. Fold them into small pillows and stuff them tightly with padding polyester to add volume, and then glue (or sew - for reliability) to the doll.
- Then we make a hat or cap. You can use burlap, straw or other bright fabric - here you can give free rein to your own imagination. Shape, color and size are also up to you.
- Attach eyes, nose(you can take a nut, a button or a bean) and put peas or lentils on the glue, which will depict the brownie's mouth. The craft is ready.
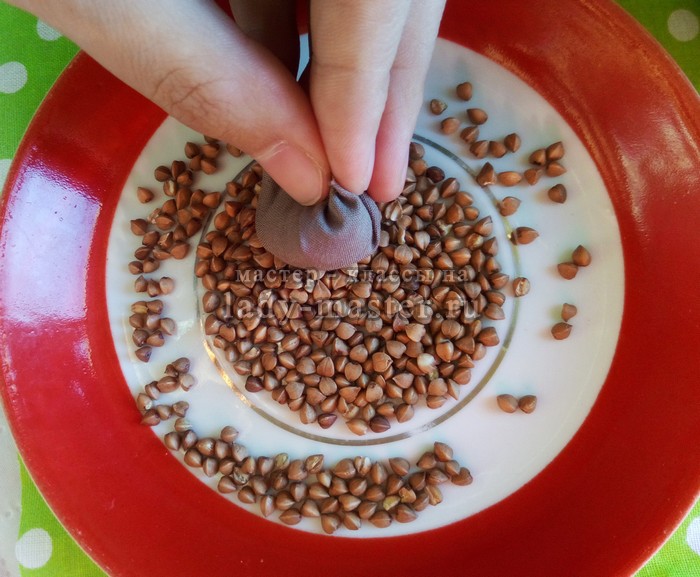
Now, to appease him, sew a small bag of bright fabric and put grain, dried berries mixed with sugar cubes in it. It is believed that the best delicacy will be mountain ash or cranberries. When the brownie is ready, choose for him the place from where the whole room will be clearly visible, it is best to let it be a corner. Decorate the space around the amulet with a dummy of vegetables and dry herbs.
How to make from nylon tights?

If you want yours to become more human-like, then you should use nylon tights or stockings as the basis for the amulet. Take a dense material of light skin color. Working with kapron will allow you to better work out the facial features of your brownie, which will give him more personality. You will need:
- dense nylon
- PVA glue or Moment
- cotton wool (can be replaced with synthetic winterizer)
- linen threads (yarn for knitting or tow)
- decorative eyes (buttons)
- wire
- small pieces of bright fabric
- sackcloth
- leg-split
Now the technology itself in stages:
- Stuff the nylon sock with cotton wool or padding polyester. If you are using tights or stockings, cut off the bottom of them in the size you want your brownie to be. Sew it on top and form a nose, mouth and cheeks on the resulting bag, securing with threads. You can add a couple of wrinkles to the old man.
- With make a beard, mustache and hair from linen threads or yarn. Attach them to your face with glue. Glue your eyes. From the wire, make the frame of the body of the brownie.
- Now take another sock or second pantyhose and stuff it tightly with cotton wool - this will be the body of the amulet. Put him on a wire frame. Wrap the arms and legs with cotton wool.
- From bright fabric open and shape the shirt, then glue it to the body. Cut out a small cape from the burlap and attach it over the shirt.
- Attach a head to the wire frame. For fidelity, it can be sewn to the body with threads. Wrap the brownie's feet and palms with nylon and stuff them with cotton wool for volume.
- Bast shoes you can crochet, made from straw, or formed from cloth or burlap.
- Add some decorative details to your brownie amulet: put a small broom in your hand, attach a bright sunflower to your hat, hang a bag of coins on your shoulder, and a small necklace of garlic cloves around your neck.
Charm from threads

Brownies made of thread often resemble a small shaggy pom-pom with bright eyes and a funny hat. To create such a charm you will need:
Operating procedure:
- Cut out two small circles from thick cardboard.. Make a small hole in the center of each. Lay them together and use thread to wrap them tightly through the hole in the middle.
- Now take scissors or a sharp blade, insert between the circles and cut the thread along the edge. Slightly move the cardboard circles apart from each other and tightly tie the resulting pompom with a thread. Take off the mugs.
- Cut out eyes from colored paper and attach a black bead to them to make pupils.. Make a nose out of beans, and a mouth out of bright foil. Attach all these details with glue to the amulet. Housewife is ready!
Test master class

The process of making a brownie from dough will take you a little longer, but the result will surely please the eye. You will need:
- salty dough
- watercolor paints
- threads
- PVA glue or Moment
- frame
- canvas (burlap, any dense material)
- cardboard
- small coins
Working process:
- First, prepare the base. Cut out a form from thick cardboard on which all parts of the amulet will be attached.. You can choose any - circle, oval, square, rectangle. Cover the shape with canvas (you can also choose the color at your discretion) or burlap and insert it into the frame.
- Now prepare the salt dough, which will be needed to sculpt the remaining elements of the amulet. Take 2 cups flour, 1 cup salt, 0.5 cup water and a little glue. Mix everything - the dough is ready.
- Fashion a brownie head, a couple of gingerbread cookies, a cheesecake, a few peppers, bagels, bast shoes and a bag from salt dough. Let them dry and color.
- Using glue, attach the head and bast shoes to the canvas. Form the hairstyle and body of the brownie from threads.
- Attach other items to the base: at the top of the picture, make a thread with peppers and bagels, glue the bag next to the brownie, put a few coins, gingerbread and other items on the glue on the side.
- Let the guard dry and put it in a prominent place in the room.
A small do-it-yourself brownie will not only decorate the interior, but also become a strong amulet against damage and other negative impacts on the house and its inhabitants. It will dissipate negative energy in the room, make friends with your pets and bring harmony and peace to the family.
Such a charm will be able to attract prosperity and good luck to the house.. It will drive away bad dreams and negative emotions from the owners. All that is required of you is to remember to praise your magical assistant and spoil him with small treats.
Every young mother probably has a large number of jars of baby food. Many simply throw them away, but these jars can be reused. For example, make a salt shaker, a sugar bowl or a container for spices. And not just a jar, but a whole craft. I got such a wonderful house.
Basic materials for crafts: a jar of baby food, burlap, jute thread, felt, cereals, white cardboard, various decorations (decorative fruits, beads, artificial leaves and flowers, insect figurines for needlework, etc.). Of course, when working, one cannot do without such “helpers” of a needlewoman as threads, scissors, super glue, a ruler and a simple pencil.
For the brownie, I took the smallest jar of baby food. Here she is:

I measured its circumference and height and cut a rectangle out of burlap. I mark the width and length with a margin, since the fabric will have to be tucked.


I put super glue on the bottom and under the neck of the jar.
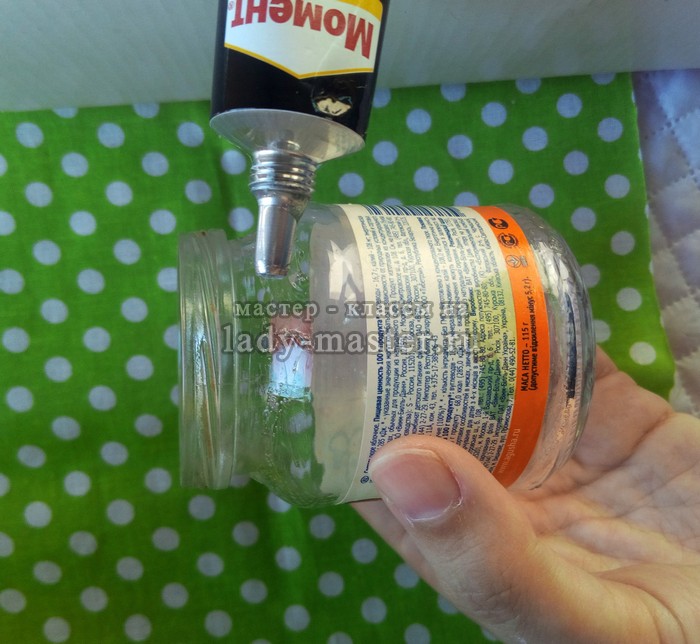
I wrap the jar with burlap, bending the edges of the fabric inward.

You need to be careful with the joint so that it turns out to be even and not very noticeable. Additionally, I also sew the joint with a thread.

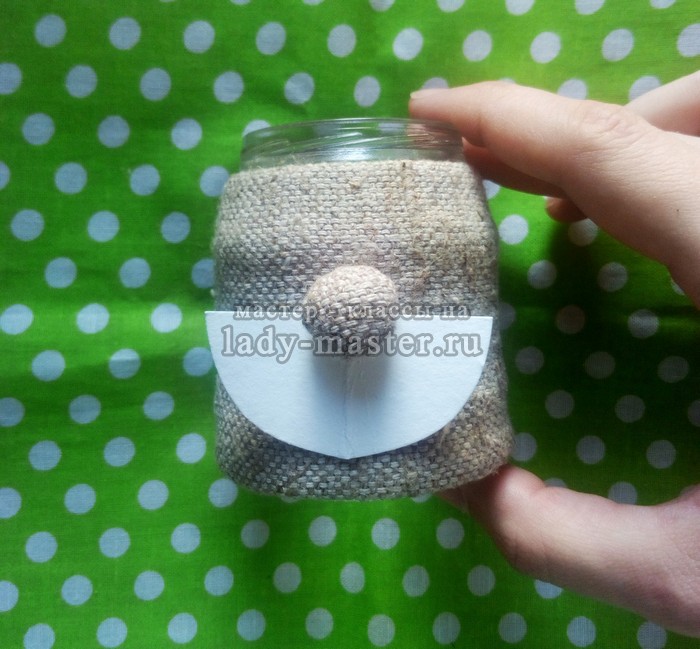
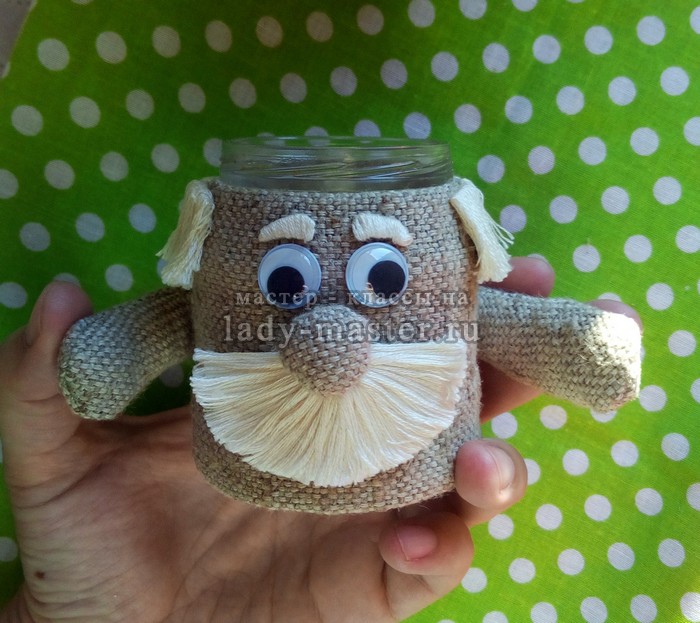
I make a spout from a piece of burlap measuring 2x2 cm. I collect it along the edge with a needle, stuff it with padding polyester and sew it up. My brownie's nose is right in the middle.


Now I start making mustaches, hair and eyebrows. I make them from white floss threads. As a basis, you will need white cardboard. I cut out such a detail from it with a “hole” for the nose.
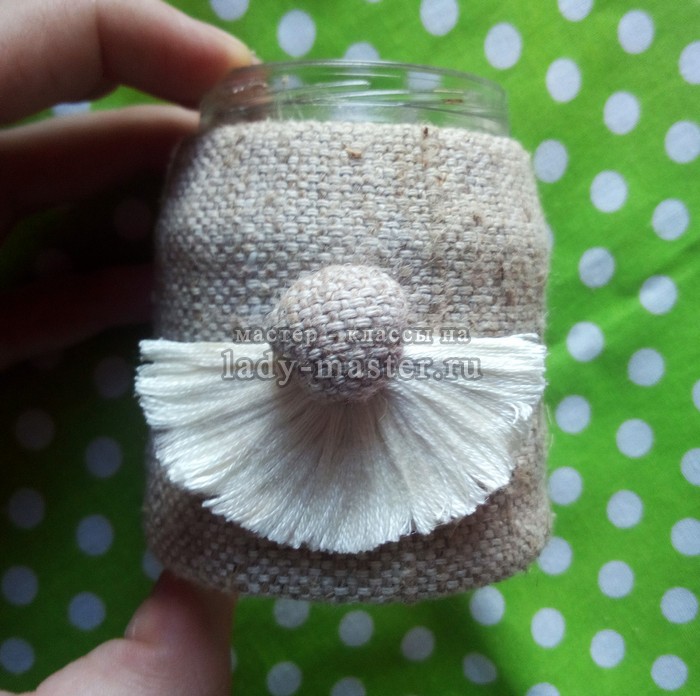
I put super glue on the cardboard semicircle. However, I leave the bottom of the part dry, as I will cut it off later. Now I wind a floss on a semicircle.

I cut the threads from the bottom, and cut the cardboard a little.

I do my hair the same way. For eyebrows, I simply wind the floss on a cardboard template.

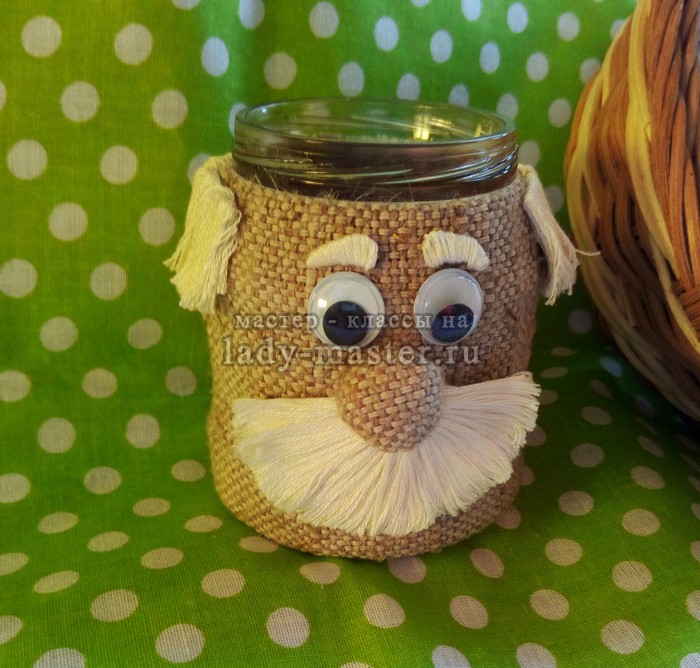
I glue the hair, eyebrows and mustache. My eyes are purchased. I just glue them on.
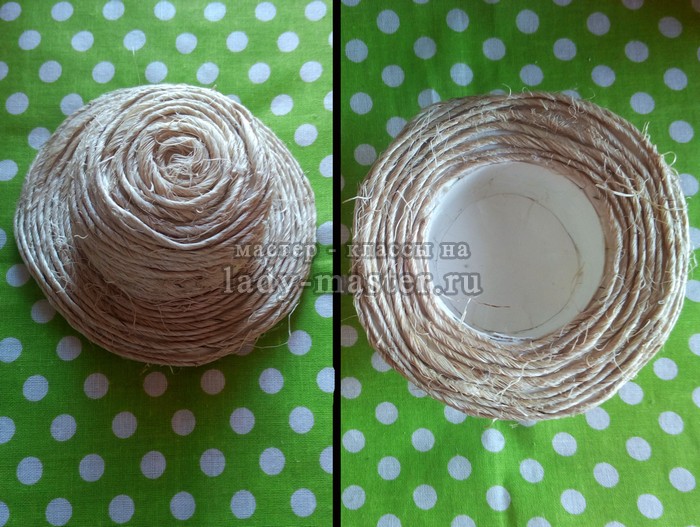
I made a hat from ordinary white cardboard and jute thread to match the color of burlap. First, I put a jar to the cardboard and mark the circumference of the neck. You need two such circles - the top and bottom of the hat.

The circle that will be the top of the hat can be cut out smaller. But around the second circle, I draw the brim of the hat and cut a hole in the circle, but smaller than the circle itself. In this backlog I make cuts and bend them. The neckline of the hat should be such that the neck of the jar can easily fit into it.
Here are the two details:

Now the brim of the hat and the top need to be fastened together. To do this, I cut out a rectangle whose length is equal to the circumference of the cut circle. The height of the rectangle is 2-3 cm. I also make cuts from above. Now I fasten all three parts with super glue.


And let the hat turn out to be not very neat, because the brownies are like that, slightly disheveled, slightly careless. Now I take a jute thread and twist a small "snail".

I smear it with glue. I also apply super glue to the top of the hat. I glue the workpiece right in the middle, and then I start to wind the thread around it.

So I move to the brim of the hat. I paste over the fields with jute thread both from the top and from the bottom. If something turned out carelessly, do not worry, then it can be disguised with jewelry.
I prime the hat inside with white acrylic paint so that the joints and pencil markings are not visible. If there are no acrylic paints, then simple gouache is also suitable for these purposes.
Now I'm going to the most interesting stage - decorating the hat. Everything that is at hand will fit here.

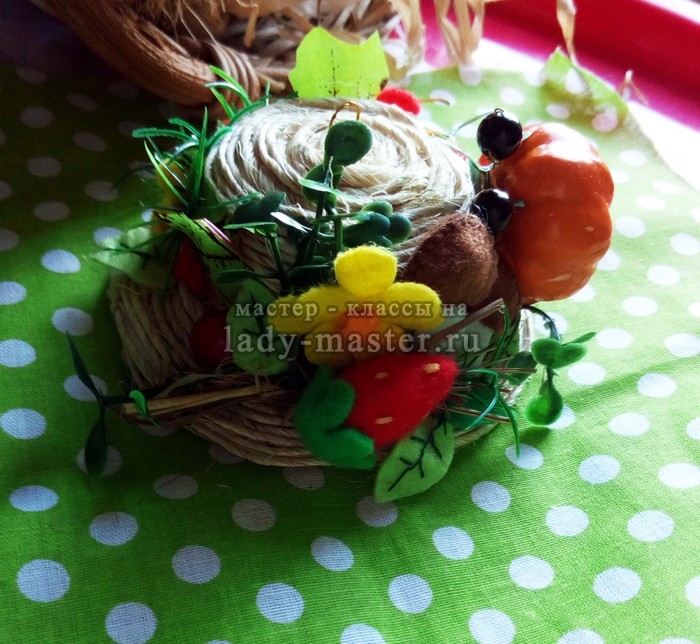
I used ready-made decorative leaves. I also cut out some leaves and flowers from felt. Mushrooms and berries are also made of felt. Pumpkin and green grass are ready-made plastic. I also used beads and dry grass.
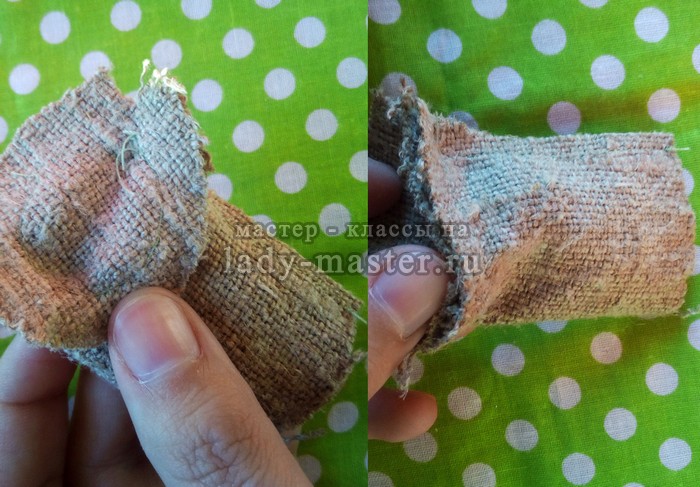
It remains to sew hands for the brownie. I make them from burlap according to the pattern. I sew on the machine and turn inside out. I stuff it with synthetic winterizer.

I carefully sew on the sides.

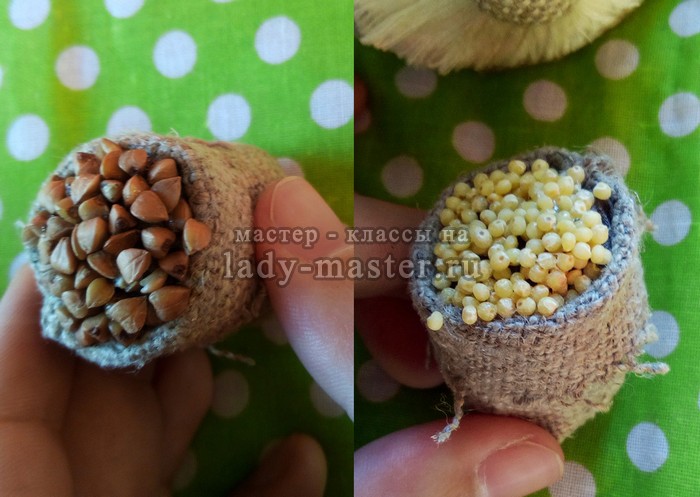
In the hands of a brownie holding bags of cereals. I sew bags from two parts - a circle (the bottom of the bag) and a rectangle. Here are the bags you get:
I fill them up to half with synthetic winterizer. Then I cut out a piece of any fabric, stuff it with padding polyester and fold it. From above, I generously grease the fabric with super-glue and lower it into the grain. The grains should stick to the fabric.
I put the fabric in the bag.
I sew the bags to the brownie. After that, you can also decorate them a little.

We put on a hat. The salt shaker in the form of a brownie is ready. And in order to remove the hat, you can make a small handle out of thin wire. You can pour salt or spices into a jar.


